Tape Backup
Proxmox tape backup provides an easy way to store datastore content onto magnetic tapes. This increases data safety because you get:
an additional copy of the data,
on a different media type (tape),
to an additional location (you can move tapes off-site)
In most restore jobs, only data from the last backup job is restored. Restore requests further decline, the older the data gets. Considering this, tape backup may also help to reduce disk usage, because you can safely remove data from disk, once it's archived on tape. This is especially true if you need to retain data for several years.
Tape backups do not provide random access to the stored data. Instead, you need to restore the data to disk, before you can access it again. Also, if you store your tapes off-site (using some kind of tape vaulting service), you need to bring them back on-site, before you can do any restores. So please consider that restoring from tape can take much longer than restoring from disk.
Tape Technology Primer
As of 2021, the only widely available tape technology standard is Linear Tape-Open (LTO). Different vendors offer LTO Ultrium tape drives, auto-loaders, and LTO tape cartridges.
There are a few vendors that offer proprietary drives with slight advantages in performance and capacity. Nevertheless, they have significant disadvantages:
proprietary (single vendor)
a much higher purchase cost
So we currently do not test such drives.
In general, LTO tapes offer the following advantages:
Durability (30 year lifespan)
High Capacity (12 TB)
Relatively low cost per TB
Cold Media
Movable (storable inside vault)
Multiple vendors (for both media and drives)
Built in AES-GCM Encryption engine
Note that Proxmox Backup Server already stores compressed data, so using the tape compression feature has no advantage.
Supported Hardware
Proxmox Backup Server supports Linear Tape-Open generation 5 (LTO-5) or later and has best-effort support for generation 4 (LTO-4). While many LTO-4 systems are known to work, some might need firmware updates or do not implement necessary features to work with Proxmox Backup Server.
Tape changing is carried out using the SCSI Medium Changer protocol, so all modern tape libraries should work.
Note
We use a custom user space tape driver written in Rust. This driver directly communicates with the tape drive using the SCSI generic interface. This may have negative side effects when used with the old Linux kernel tape driver, so you should not use that driver with Proxmox tape backup.
Drive Performance
Current LTO-8 tapes provide read/write speeds of up to 360 MB/s. This means, that it still takes a minimum of 9 hours to completely write or read a single tape (even at maximum speed).
The only way to speed that data rate up is to use more than one drive. That way, you can run several backup jobs in parallel, or run restore jobs while the other dives are used for backups.
Also consider that you first need to read data from your datastore (disk). However, a single spinning disk is unable to deliver data at this rate. We measured a maximum rate of about 60MB/s to 100MB/s in practice, so it takes 33 hours to read the 12TB needed to fill up an LTO-8 tape. If you want to write to your tape at full speed, please make sure that the source datastore is able to deliver that performance (for example, by using SSDs).
LTO-9+ considerations
Since LTO-9, it is necessary to initialize new media in your drives, this is called Media Optimization. This usually takes between 40 and 120 minutes per medium. It is recommended to initialize your media in this manner with the tools provided by your hardware vendor of your drive or changer. Some tape changers have a method to 'bulk' initialize your media.
Because of this, formatting tapes is handled differently in Proxmox Backup Server to avoid re-optimizing on each format/labelling. If you want to format your media for use with the Proxmox Backup Server the first time or after use with another program, either use the functionality of your drive/changer, or use the 'slow' format on the cli:
# proxmox-tape format --drive your-drive --fast 0
This will completely remove all pre-existing data and trigger a Media Optimization pass.
If you format a partitioned LTO-9 medium with the 'fast' method (the default or by setting --fast 1), only the first partition will be formatted, so make sure to use the 'slow' method.
Terminology
- Tape Labels:
are used to uniquely identify a tape. You would normally apply a sticky paper label to the front of the cartridge. We additionally store the label text magnetically on the tape (first file on tape).
- Barcodes:
are a special form of tape labels, which are electronically readable. Most LTO tape robots use an 8 character string encoded as Code 39, as defined in the LTO Ultrium Cartridge Label Specification.
You can either buy such barcode labels from your cartridge vendor, or print them yourself. You can use our LTO Barcode Generator app, if you would like to print them yourself.
Note
Physical labels and the associated adhesive should have an environmental performance to match or exceed the environmental specifications of the cartridge to which it is applied.
- Media Pools:
A media pool is a logical container for tapes. A backup job targets one media pool, so a job only uses tapes from that pool. The pool additionally defines how long a backup job can append data to tapes (allocation policy) and how long you want to keep the data (retention policy).
- Media Set:
A group of continuously written tapes (all from the same media pool).
- Tape drive:
The device used to read and write data to the tape. There are standalone drives, but drives are usually shipped within tape libraries.
- Tape changer:
A device which can change the tapes inside a tape drive (tape robot). They are usually part of a tape library.
- Tape library:
A storage device that contains one or more tape drives, a number of slots to hold tape cartridges, a barcode reader to identify tape cartridges, and an automated method for loading tapes (a robot).
This is also commonly known as an 'autoloader', 'tape robot' or 'tape jukebox'.
- Inventory:
The inventory stores the list of known tapes (with additional status information).
- Catalog:
A media catalog stores information about the media content.
Tape Quick Start
Configure your tape hardware (drives and changers)
Configure one or more media pools
Label your tape cartridges
Start your first tape backup job ...
Configuration
Please note that you can configure anything using the graphical user interface or the command-line interface. Both methods result in the same configuration.
Tape changers

Tape changers (robots) are part of a Tape Library. They contain a number of slots to hold tape cartridges, a barcode reader to identify tape cartridges and an automated method for loading tapes.
You can skip this step if you are using a standalone drive.
Linux is able to auto detect these devices, and you can get a list of available devices using:
# proxmox-tape changer scan
┌─────────────────────────────┬─────────┬──────────────┬────────┐
│ path                        │ vendor  │ model        │ serial │
╞═════════════════════════════╪═════════╪══════════════╪════════╡
│ /dev/tape/by-id/scsi-CC2C52 │ Quantum │ Superloader3 │ CC2C52 │
└─────────────────────────────┴─────────┴──────────────┴────────┘
In order to use a device with Proxmox Backup Server, you need to create a configuration entry:
# proxmox-tape changer create sl3 --path /dev/tape/by-id/scsi-CC2C52
Where sl3 is an arbitrary name you can choose.
Note
Please use the persistent device path names from inside
/dev/tape/by-id/. Names like /dev/sg0 may point to a
different device after reboot, and that is not what you want.

This operation can also be carried out from the GUI, by navigating to the Changers tab of Tape Backup and clicking Add.
You can display the final configuration with:
# proxmox-tape changer config sl3
┌──────┬─────────────────────────────┐
│ Name │ Value                       │
╞══════╪═════════════════════════════╡
│ name │ sl3                         │
├──────┼─────────────────────────────┤
│ path │ /dev/tape/by-id/scsi-CC2C52 │
└──────┴─────────────────────────────┘
Or simply list all configured changer devices (as seen in the Changers tab of the GUI):
# proxmox-tape changer list
┌──────┬─────────────────────────────┬─────────┬──────────────┬────────────┐
│ name │ path                        │ vendor  │ model        │ serial     │
╞══════╪═════════════════════════════╪═════════╪══════════════╪════════════╡
│ sl3  │ /dev/tape/by-id/scsi-CC2C52 │ Quantum │ Superloader3 │ CC2C52     │
└──────┴─────────────────────────────┴─────────┴──────────────┴────────────┘
The Vendor, Model and Serial number are auto-detected, but only shown if the device is online.
To test your setup, please query the status of the changer device with:
# proxmox-tape changer status sl3
┌───────────────┬──────────┬────────────┬─────────────┐
│ entry-kind    │ entry-id │ changer-id │ loaded-slot │
╞═══════════════╪══════════╪════════════╪═════════════╡
│ drive         │        0 │ vtape1     │           1 │
├───────────────┼──────────┼────────────┼─────────────┤
│ slot          │        1 │            │             │
├───────────────┼──────────┼────────────┼─────────────┤
│ slot          │        2 │ vtape2     │             │
├───────────────┼──────────┼────────────┼─────────────┤
│ ...           │      ... │            │             │
├───────────────┼──────────┼────────────┼─────────────┤
│ slot          │       16 │            │             │
└───────────────┴──────────┴────────────┴─────────────┘
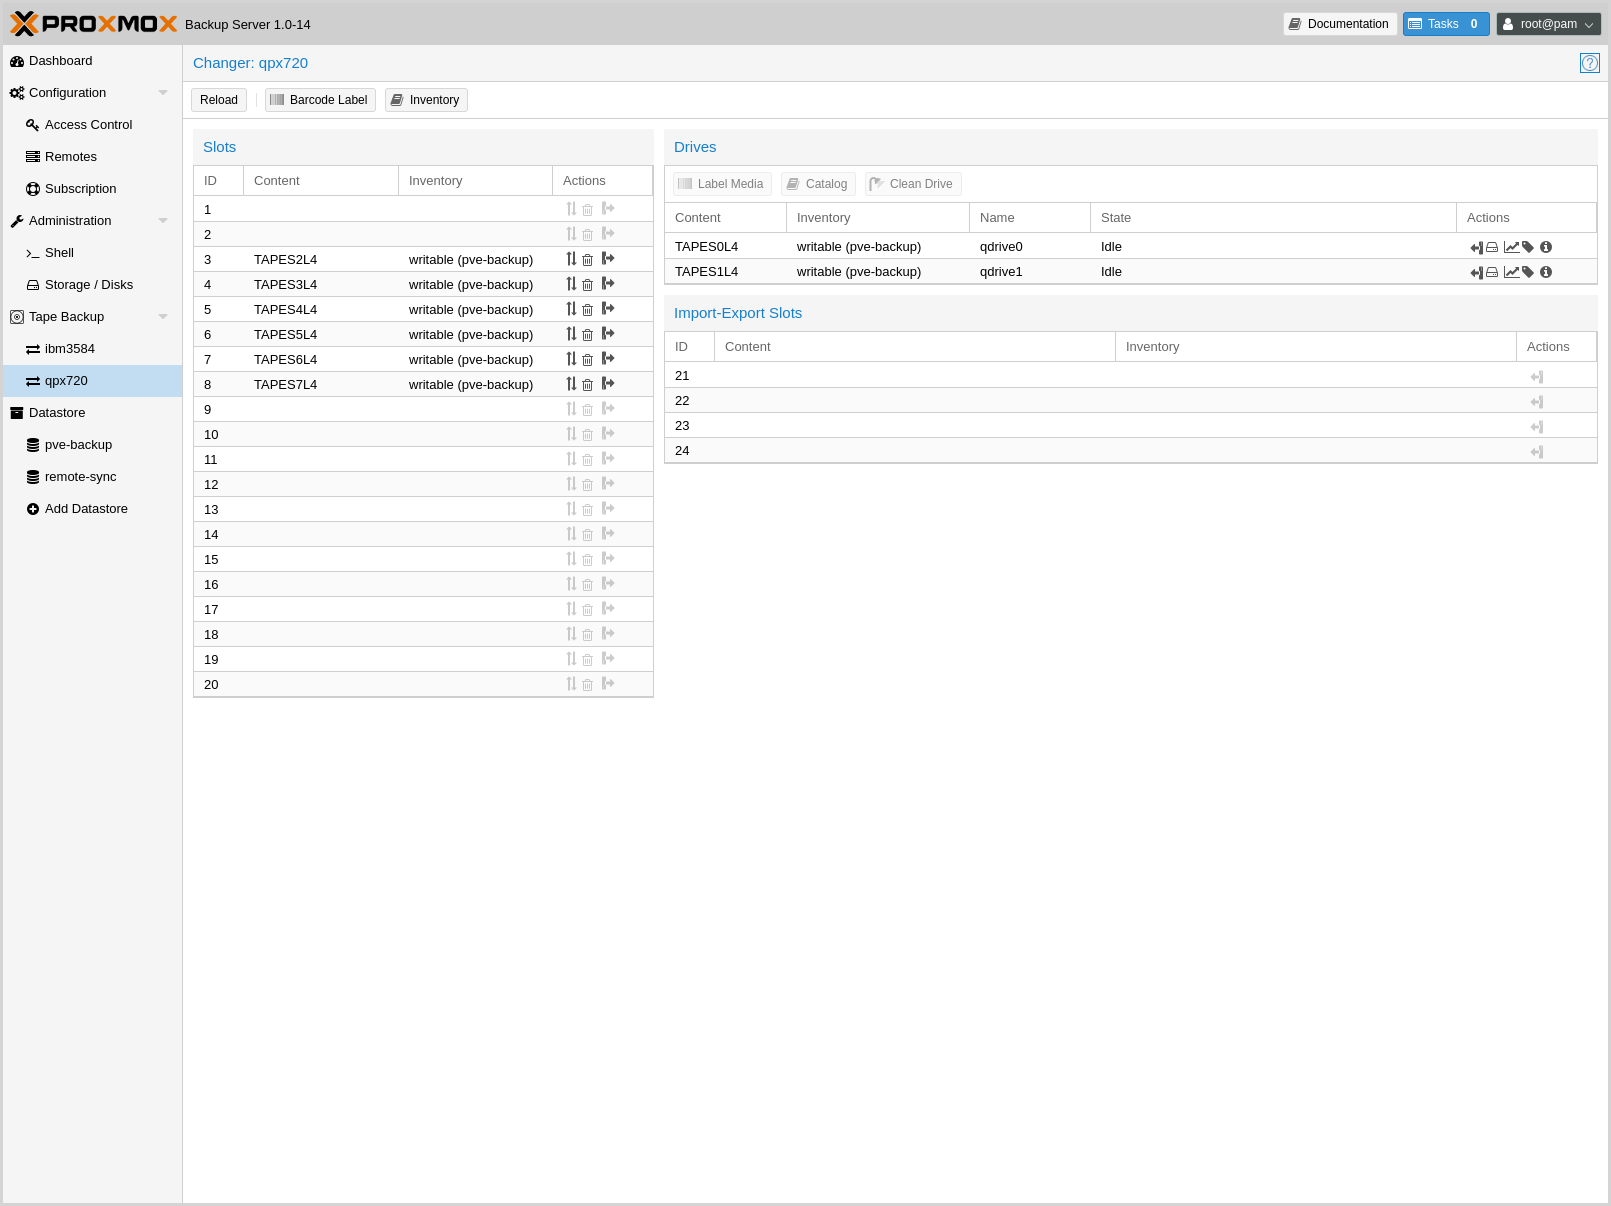
Tape libraries usually provide some special import/export slots (also
called "mail slots"). Tapes inside those slots are accessible from
outside, making it easy to add/remove tapes to/from the library. Those
tapes are considered to be "offline", so backup jobs will not use
them. Those special slots are auto-detected and marked as an
import-export slot in the status command.
It's worth noting that some of the smaller tape libraries don't have such slots. While they have something called a "Mail Slot", that slot is just a way to grab the tape from the gripper. They are unable to hold media while the robot does other things. They also do not expose that "Mail Slot" over the SCSI interface, so you won't see them in the status output.
As a workaround, you can mark some of the normal slots as export
slot. The software treats those slots like real import-export
slots, and the media inside those slots are considered to be 'offline'
(not available for backup):
# proxmox-tape changer update sl3 --export-slots 15,16
After that, you can see those artificial import-export slots in
the status output:
# proxmox-tape changer status sl3
┌───────────────┬──────────┬────────────┬─────────────┐
│ entry-kind    │ entry-id │ changer-id │ loaded-slot │
╞═══════════════╪══════════╪════════════╪═════════════╡
│ drive         │        0 │ vtape1     │           1 │
├───────────────┼──────────┼────────────┼─────────────┤
│ import-export │       15 │            │             │
├───────────────┼──────────┼────────────┼─────────────┤
│ import-export │       16 │            │             │
├───────────────┼──────────┼────────────┼─────────────┤
│ slot          │        1 │            │             │
├───────────────┼──────────┼────────────┼─────────────┤
│ slot          │        2 │ vtape2     │             │
├───────────────┼──────────┼────────────┼─────────────┤
│ ...           │      ... │            │             │
├───────────────┼──────────┼────────────┼─────────────┤
│ slot          │       14 │            │             │
└───────────────┴──────────┴────────────┴─────────────┘
Advanced options
Since not all tape changer behave the same, there is sometimes the need for configuring advanced options.
Currently there are the following:
eject-before-unload : This is needed for some changers that require a tape to be ejected before unloading from the drive.
You can set these options with proxmox-tape like this:
# proxmox-tape changer update sl3 --eject-before-unload true
Tape drives
Linux is able to auto detect tape drives, and you can get a list of available tape drives using:
# proxmox-tape drive scan
┌────────────────────────────────┬────────┬─────────────┬────────┐
│ path                           │ vendor │ model       │ serial │
╞════════════════════════════════╪════════╪═════════════╪════════╡
│ /dev/tape/by-id/scsi-12345-sg  │ IBM    │ ULT3580-TD4 │  12345 │
└────────────────────────────────┴────────┴─────────────┴────────┘
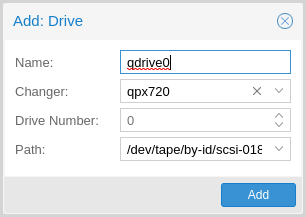
In order to use that drive with Proxmox, you need to create a configuration entry. This can be done through Tape Backup -> Drives in the GUI or by using the command below:
# proxmox-tape drive create mydrive --path /dev/tape/by-id/scsi-12345-sg
Note
Please use the persistent device path names from inside
/dev/tape/by-id/. Names like /dev/sg0 may point to a
different device after reboot, and that is not what you want.
If you have a tape library, you also need to set the associated changer device:
# proxmox-tape drive update mydrive --changer sl3 --changer-drivenum 0
The --changer-drivenum is only necessary if the tape library
includes more than one drive (the changer status command lists all
drive numbers).
You can display the final configuration with:
# proxmox-tape drive config mydrive
┌─────────┬────────────────────────────────┐
│ Name    │ Value                          │
╞═════════╪════════════════════════════════╡
│ name    │ mydrive                        │
├─────────┼────────────────────────────────┤
│ path    │ /dev/tape/by-id/scsi-12345-sg  │
├─────────┼────────────────────────────────┤
│ changer │ sl3                            │
└─────────┴────────────────────────────────┘
Note
The changer-drivenum value 0 is not stored in the
configuration, because it is the default.
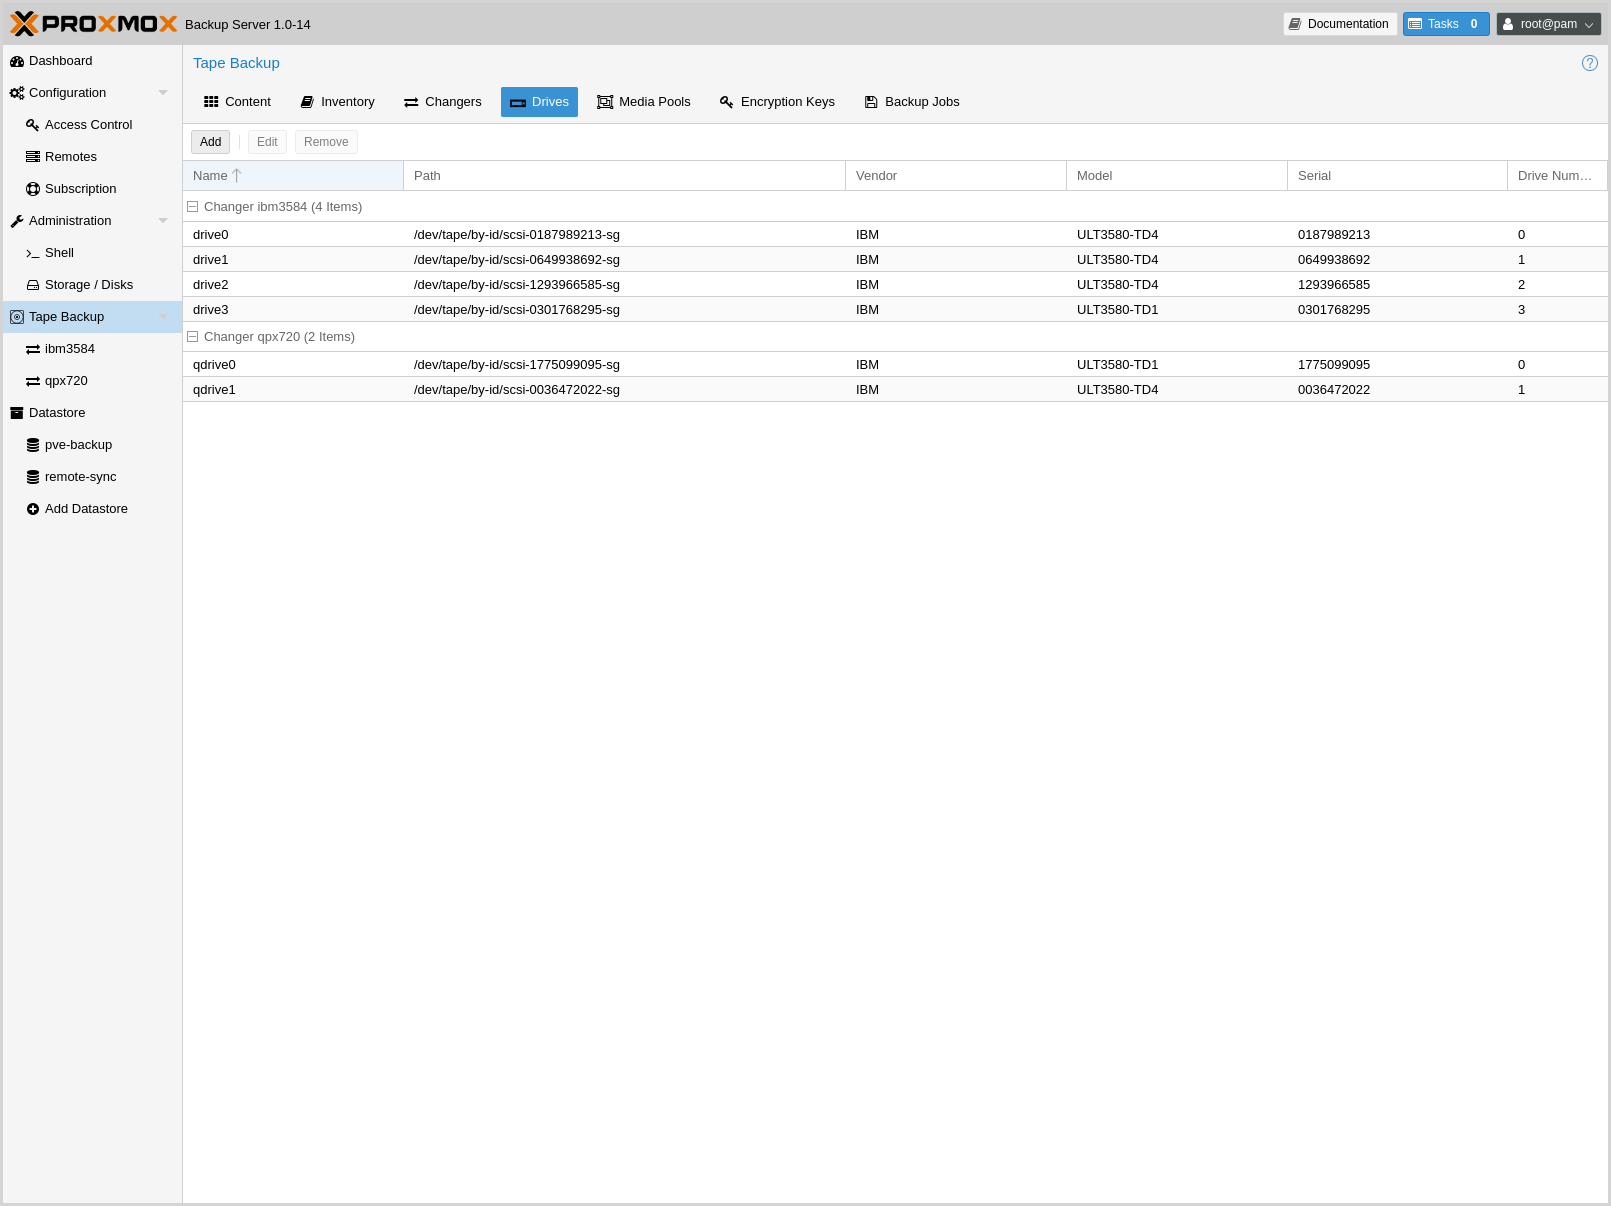
To list all configured drives use:
# proxmox-tape drive list
┌──────────┬────────────────────────────────┬─────────┬────────┬─────────────┬────────┐
│ name     │ path                           │ changer │ vendor │ model       │ serial │
╞══════════╪════════════════════════════════╪═════════╪════════╪═════════════╪════════╡
│ mydrive  │ /dev/tape/by-id/scsi-12345-sg  │ sl3     │ IBM    │ ULT3580-TD4 │ 12345  │
└──────────┴────────────────────────────────┴─────────┴────────┴─────────────┴────────┘
The Vendor, Model and Serial number are auto detected and only shown if the device is online.
For testing, you can simply query the drive status with:
# proxmox-tape status --drive mydrive
┌────────────────┬──────────────────────────┐
│ Name           │ Value                    │
╞════════════════╪══════════════════════════╡
│ blocksize      │ 0                        │
├────────────────┼──────────────────────────┤
│ density        │ LTO4                     │
├────────────────┼──────────────────────────┤
│ compression    │ 1                        │
├────────────────┼──────────────────────────┤
│ buffer-mode    │ 1                        │
├────────────────┼──────────────────────────┤
│ alert-flags    │ (empty)                  │
├────────────────┼──────────────────────────┤
│ file-number    │ 0                        │
├────────────────┼──────────────────────────┤
│ block-number   │ 0                        │
├────────────────┼──────────────────────────┤
│ manufactured   │ Fri Dec 13 01:00:00 2019 │
├────────────────┼──────────────────────────┤
│ bytes-written  │ 501.80 GiB               │
├────────────────┼──────────────────────────┤
│ bytes-read     │ 4.00 MiB                 │
├────────────────┼──────────────────────────┤
│ medium-passes  │ 20                       │
├────────────────┼──────────────────────────┤
│ medium-wearout │ 0.12%                    │
├────────────────┼──────────────────────────┤
│ volume-mounts  │ 2                        │
└────────────────┴──────────────────────────┘
Note
Blocksize should always be 0 (variable block size mode). This is the default anyway.
Media Pools
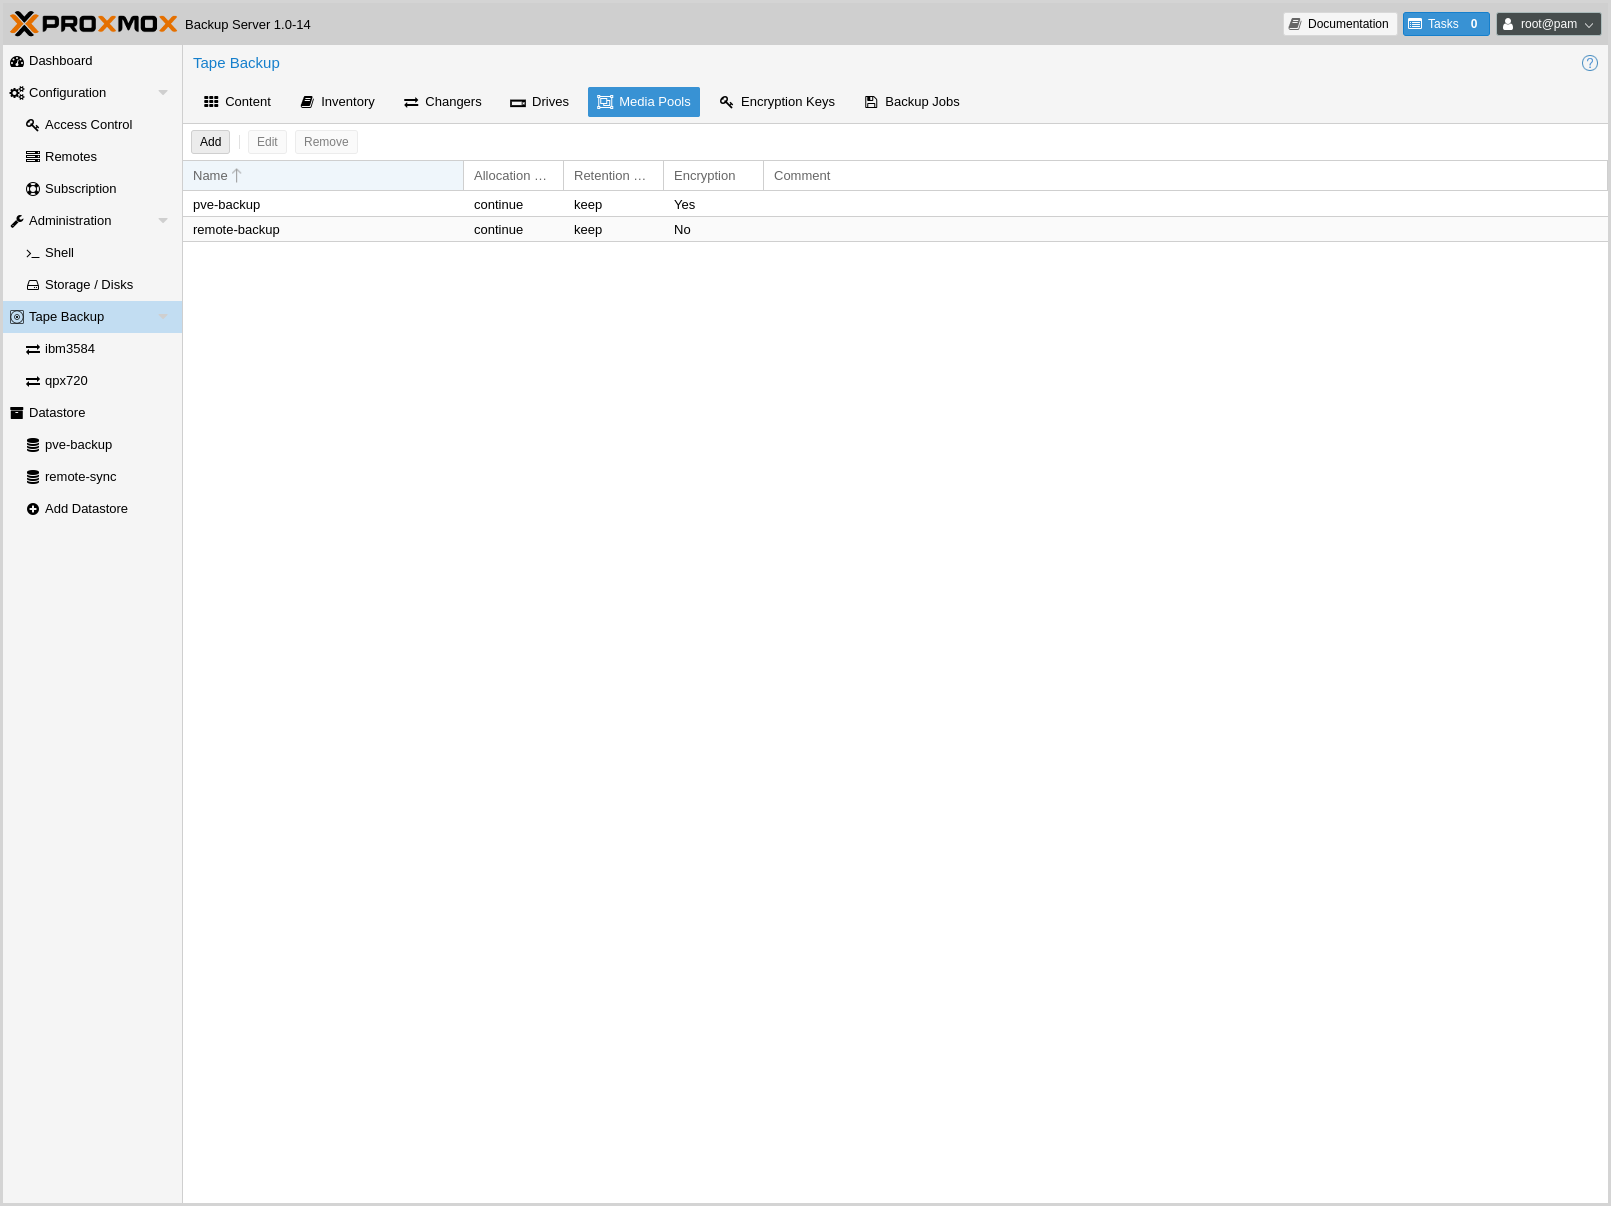
A media pool is a logical container for tapes. A backup job targets a single media pool, so a job only uses tapes from that pool.
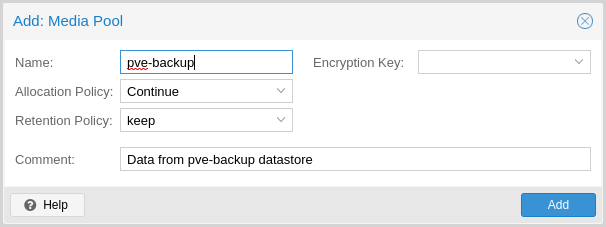
To create a new media pool, add one from Tape Backup -> Media Pools in the GUI, or enter the following command:
// proxmox-tape pool create <name> [OPTIONS]

# proxmox-tape pool create daily
Additional options can be set later, using the update command:
# proxmox-tape pool update daily --allocation daily --retention 7days
To list all configured pools use:
# proxmox-tape pool list
┌───────┬──────────┬────────────┬───────────┬──────────┐
│ name  │ drive    │ allocation │ retention │ template │
╞═══════╪══════════╪════════════╪═══════════╪══════════╡
│ daily │ mydrive  │ daily      │ 7days     │          │
└───────┴──────────┴────────────┴───────────┴──────────┘
Tape Backup Jobs
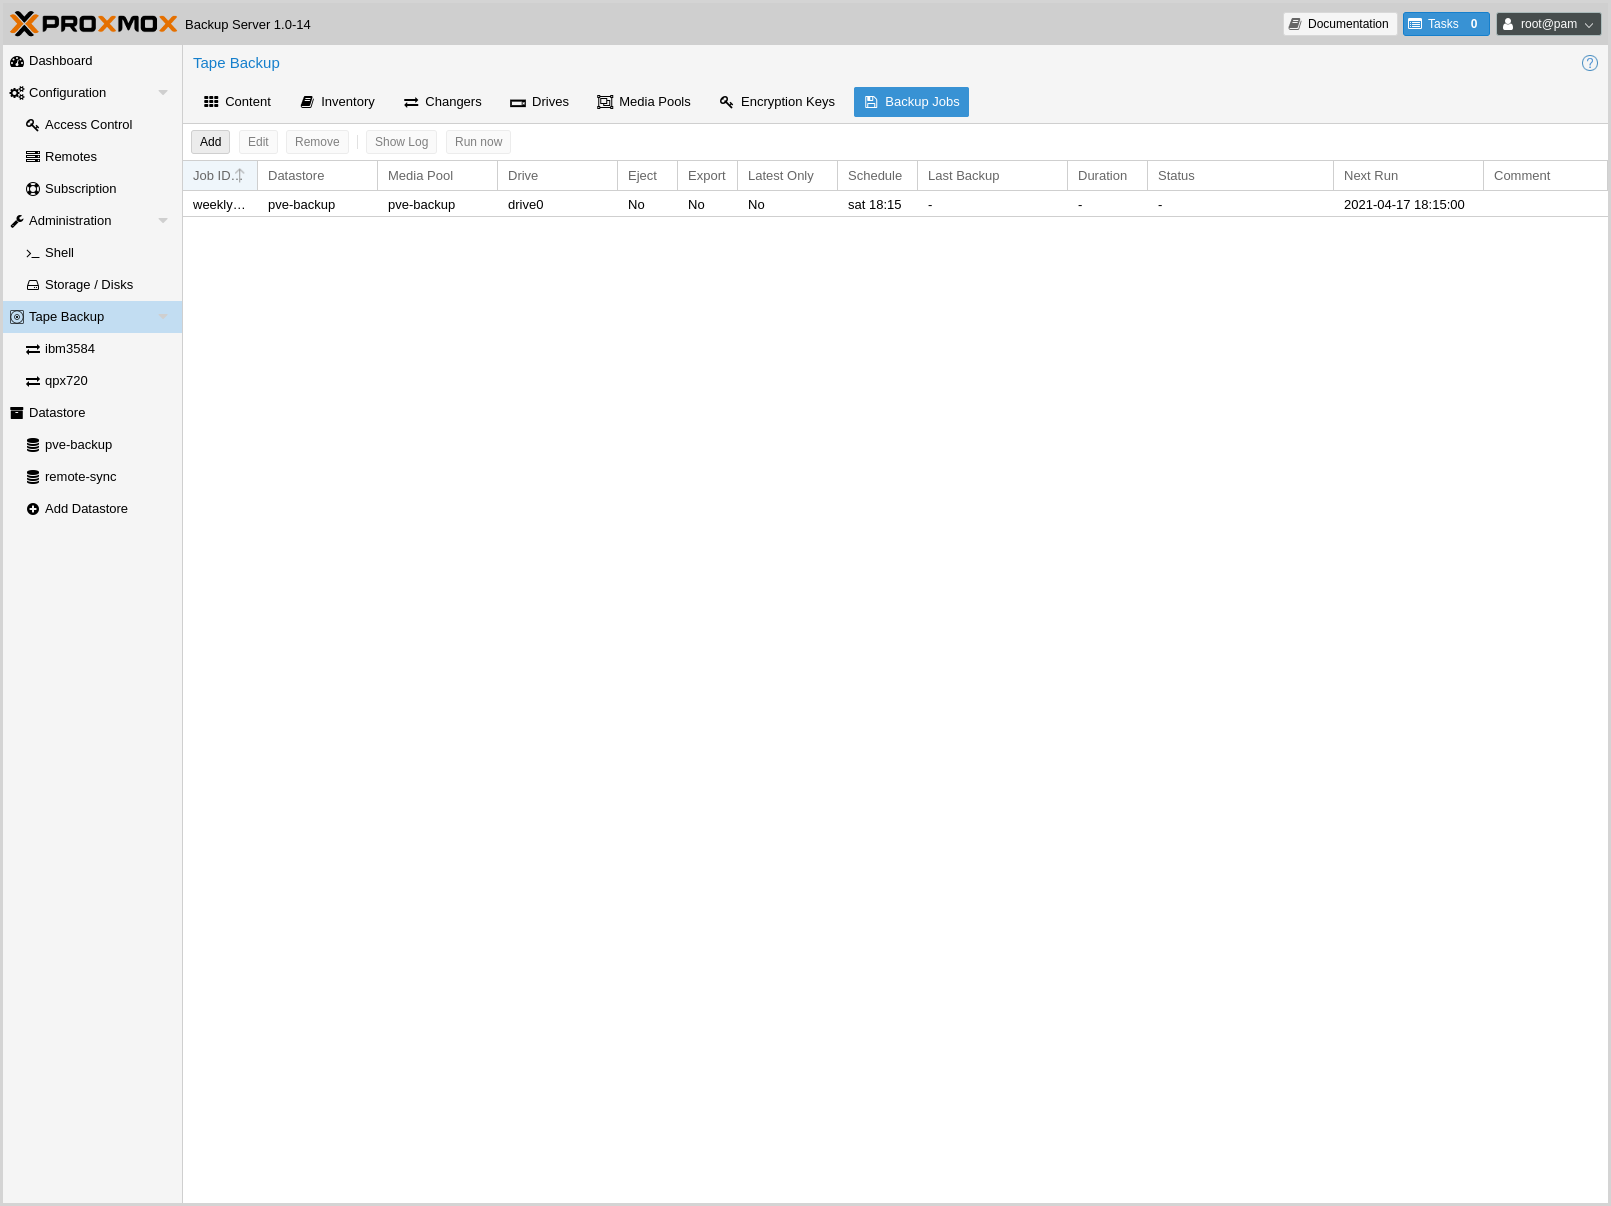
To automate tape backup, you can configure tape backup jobs which write datastore content to a media pool, based on a specific time schedule. The required settings are:
store: The datastore you want to backuppool: The media pool - only tape cartridges from that pool are used.drive: The tape drive.schedule: Job schedule (see Calendar Events)
For example, to configure a tape backup job for datastore vmstore1
use:
# proxmox-tape backup-job create job2 --store vmstore1 \
  --pool yourpool --drive yourdrive --schedule daily
The backup includes all snapshots from a backup group by default. You can
set the latest-only flag to include only the latest snapshots:
# proxmox-tape backup-job update job2 --latest-only
Backup jobs can use email to send tape request notifications or report errors. You can set the notification user with:
# proxmox-tape backup-job update job2 --notify-user root@pam
Note
The email address is a property of the user (see User Management).
It is sometimes useful to eject the tape from the drive after a
backup. For a standalone drive, the eject-media option ejects the
tape, making sure that the following backup cannot use the tape
(unless someone manually loads the tape again). For tape libraries,
this option unloads the tape to a free slot, which provides better
dust protection than inside a drive:
# proxmox-tape backup-job update job2 --eject-media
Note
For failed jobs, the tape remains in the drive.
For tape libraries, the export-media-set option moves all tapes from
the media set to an export slot, making sure that the following backup
cannot use the tapes. An operator can pick up those tapes and move them
to a vault.
# proxmox-tape backup-job update job2 --export-media-set
Note
The export-media-set option can be used to force the start
of a new media set, because tapes from the current set are no
longer online.
It is also possible to run backup jobs manually:
# proxmox-tape backup-job run job2
To remove a job, please use:
# proxmox-tape backup-job remove job2
By default, all (recursive) namespaces of the datastore are included in a tape
backup. You can specify a single namespace with ns and a depth with
max-depth. For example:
# proxmox-tape backup-job update job2 --ns mynamespace --max-depth 3
If no max-depth is given, it will include all recursive namespaces.
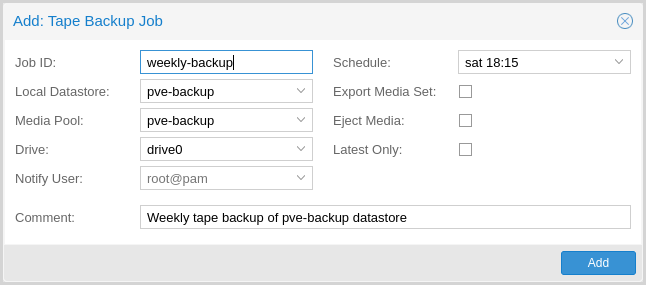
This same functionality also exists in the GUI, under the Backup Jobs tab of Tape Backup, where Local Datastore relates to the datastore you want to backup and Media Pool is the pool to back up to.
Administration
Many sub-commands of the proxmox-tape command-line tools take a
parameter called --drive, which specifies the tape drive you want
to work on. For convenience, you can set this in an environment
variable:
# export PROXMOX_TAPE_DRIVE=mydrive
You can then omit the --drive parameter from the command. If the
drive has an associated changer device, you may also omit the changer
parameter from commands that need a changer device, for example:
# proxmox-tape changer status
should display the changer status of the changer device associated with
drive mydrive.
Label Tapes
By default, tape cartridges all look the same, so you need to put a label on them for unique identification. First, put a sticky paper label with some human readable text on the cartridge.
If you use a Tape Library, you should use an 8 character string encoded as Code 39, as defined in the LTO Ultrium Cartridge Label Specification. You can either buy such barcode labels from your cartridge vendor, or print them yourself. You can use our LTO Barcode Generator app to print them.
Next, you need to write that same label text to the tape, so that the software can uniquely identify the tape too.
For a standalone drive, manually insert the new tape cartridge into the drive and run:
# proxmox-tape label --changer-id <label-text> [--pool <pool-name>]
You may omit the --pool argument to allow the tape to be used by any pool.
Note
For safety reasons, this command fails if the tape contains any data. If you want to overwrite it anyway, erase the tape first.
You can verify success by reading back the label:
# proxmox-tape read-label
┌─────────────────┬──────────────────────────────────────┐
│ Name            │ Value                                │
╞═════════════════╪══════════════════════════════════════╡
│ changer-id      │ vtape1                               │
├─────────────────┼──────────────────────────────────────┤
│ uuid            │ 7f42c4dd-9626-4d89-9f2b-c7bc6da7d533 │
├─────────────────┼──────────────────────────────────────┤
│ ctime           │ Wed Jan  6 09:07:51 2021             │
├─────────────────┼──────────────────────────────────────┤
│ pool            │ daily                                │
├─────────────────┼──────────────────────────────────────┤
│ media-set-uuid  │ 00000000-0000-0000-0000-000000000000 │
├─────────────────┼──────────────────────────────────────┤
│ media-set-ctime │ Wed Jan  6 09:07:51 2021             │
└─────────────────┴──────────────────────────────────────┘
Note
The media-set-uuid using all zeros indicates an empty
tape (not used by any media set).
If you have a tape library, apply the sticky barcode label to the tape cartridges first. Then load those empty tapes into the library. You can then label all unlabeled tapes with a single command:
# proxmox-tape barcode-label [--pool <pool-name>]
Run Tape Backups
To manually run a backup job click Run Now in the GUI or use the command:
# proxmox-tape backup <store> <pool> [OPTIONS]
The following options are available:
- --eject-media
Eject media upon job completion.
It is normally good practice to eject the tape after use. This unmounts the tape from the drive and prevents the tape from getting dusty.
- --export-media-set
Export media set upon job completion.
After a successful backup job, this moves all tapes from the used media set into import-export slots. The operator can then pick up those tapes and move them to a media vault.
- --ns
The namespace to backup.
Used if you only want to backup a specific namespace. If omitted, the root namespace is assumed.
- --max-depth
The depth to recurse namespaces.
0means no recursion at all (only the given namespace). If omitted, all namespaces are recursed (below the given one).
Restore from Tape
Restore is done at media-set granularity, so you first need to find out which media set contains the data you want to restore. This information is stored in the media catalog. If you do not have media catalogs, you need to restore them first. Please note that you need the catalog to find your data, but restoring a complete media-set does not need media catalogs.
The following command lists the media content (from catalog):
# proxmox-tape media content
┌────────────┬──────┬──────────────────────────┬────────┬────────────────────────────────┬──────────────────────────────────────┐
│ label-text │ pool │ media-set-name           │ seq-nr │ snapshot                       │ media-set-uuid                       │
╞════════════╪══════╪══════════════════════════╪════════╪════════════════════════════════╪══════════════════════════════════════╡
│ TEST01L8   │ p2   │ Wed Jan 13 13:55:55 2021 │      0 │ vm/201/2021-01-11T10:43:48Z    │ 9da37a55-aac7-4deb-91c6-482b3b675f30 │
├────────────┼──────┼──────────────────────────┼────────┼────────────────────────────────┼──────────────────────────────────────┤
│        ... │ ...  │                      ... │    ... │ ...                            │                                  ... │
└────────────┴──────┴──────────────────────────┴────────┴────────────────────────────────┴──────────────────────────────────────┘
A restore job reads the data from the media set and moves it back to data disk (datastore):
// proxmox-tape restore <media-set-uuid> <datastore>

# proxmox-tape restore 9da37a55-aac7-4deb-91c6-482b3b675f30 mystore
Single Snapshot Restore
Sometimes it is not necessary to restore an entire media-set, but only some
specific snapshots from the tape. This can be achieved with the snapshots
parameter:
// proxmox-tape restore <media-set-uuid> <datastore> [<snapshot>]

# proxmox-tape restore 9da37a55-aac7-4deb-91c6-482b3b675f30 mystore sourcestore:host/hostname/2022-01-01T00:01:00Z
This first restores the snapshot to a temporary location, then restores the relevant chunk archives, and finally restores the snapshot data to the target datastore.
The snapshot parameter can be passed multiple times, in order to restore
multiple snapshots with one restore action.
Note
When using the single snapshot restore, the tape must be traversed more than once, which, if you restore many snapshots at once, can take longer than restoring the whole datastore.
Namespaces
It is also possible to select and map specific namespaces from a media-set
during a restore. This is possible with the namespaces parameter.
The format for the parameter is:
store=<source-datastore>[,source=<source-ns>][,target=<target-ns>][,max-depth=<depth>]
If source or target is not given, the root namespace is assumed.
When no max-depth is given, the source namespace will be fully recursed.
An example restore command:
# proxmox-tape restore 9da37a55-aac7-4deb-91c6-482b3b675f30 mystore --namespaces store=sourcedatastore,source=ns1,target=ns2,max-depth=2
The parameter can be given multiple times. It can also be combined with the
snapshots parameter to only restore those snapshots and map them to different
namespaces.
Update Inventory
Restore Catalog
To restore a catalog from an existing tape, just insert the tape into the drive and execute:
# proxmox-tape catalog
You can restore from a tape even without an existing catalog, but only the whole media set. If you do this, the catalog will be automatically created.
Encryption Key Management
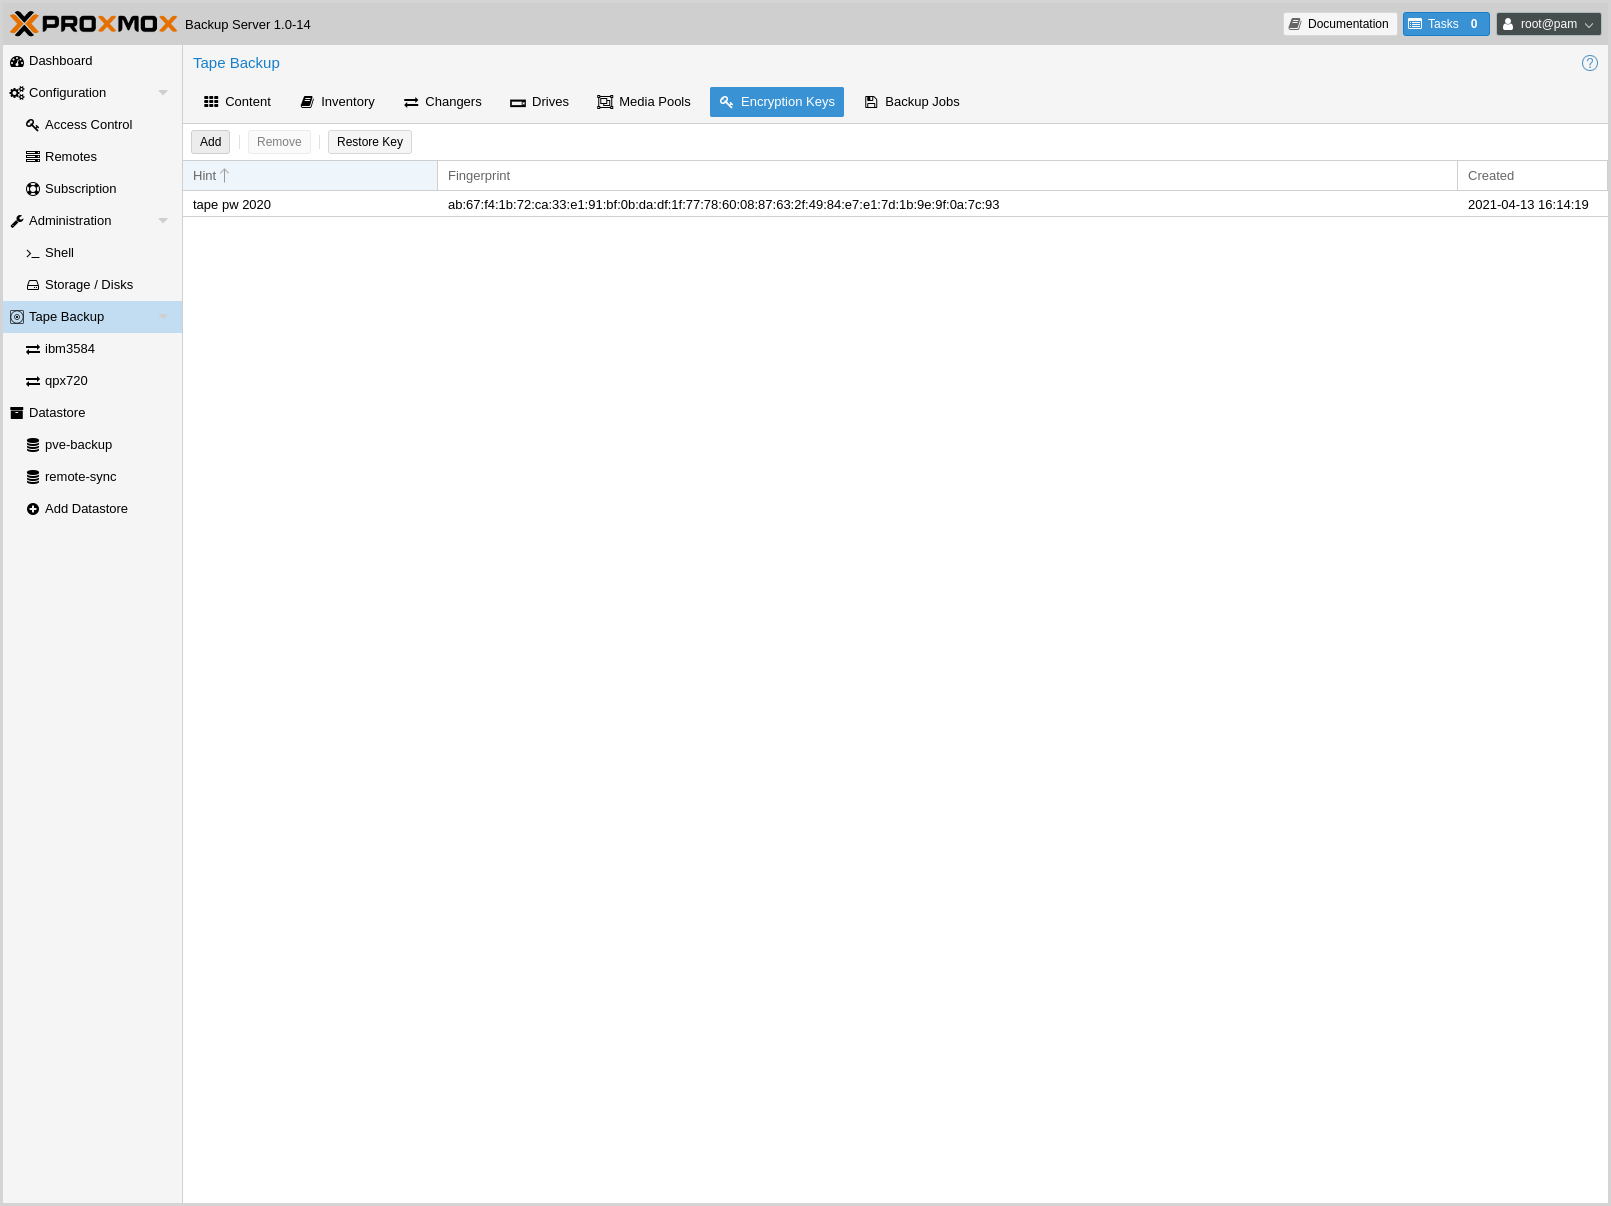
Proxmox Backup Server also provides an interface for handling encryption keys on
the backup server. Encryption keys can be managed from the Tape Backup ->
Encryption Keys section of the GUI or through the proxmox-tape key
command-line tool. To create a new encryption key from the command line:
# proxmox-tape key create --hint "tape pw 2020"
Tape Encryption Key Password: **********
Verify Password: **********
"14:f8:79:b9:f5:13:e5:dc:bf:b6:f9:88:48:51:81:dc:79:bf:a0:22:68:47:d1:73:35:2d:b6:20:e1:7f:f5:0f"
List existing encryption keys:
# proxmox-tape key list
┌───────────────────────────────────────────────────┬───────────────┐
│ fingerprint                                       │ hint          │
╞═══════════════════════════════════════════════════╪═══════════════╡
│ 14:f8:79:b9:f5:13:e5:dc: ...   :b6:20:e1:7f:f5:0f │ tape pw 2020  │
└───────────────────────────────────────────────────┴───────────────┘
To show encryption key details:
# proxmox-tape key show 14:f8:79:b9:f5:13:e5:dc:...:b6:20:e1:7f:f5:0f
┌─────────────┬───────────────────────────────────────────────┐
│ Name        │ Value                                         │
╞═════════════╪═══════════════════════════════════════════════╡
│ kdf         │ scrypt                                        │
├─────────────┼───────────────────────────────────────────────┤
│ created     │ Sat Jan 23 14:47:21 2021                      │
├─────────────┼───────────────────────────────────────────────┤
│ modified    │ Sat Jan 23 14:47:21 2021                      │
├─────────────┼───────────────────────────────────────────────┤
│ fingerprint │ 14:f8:79:b9:f5:13:e5:dc:...:b6:20:e1:7f:f5:0f │
├─────────────┼───────────────────────────────────────────────┤
│ hint        │ tape pw 2020                                  │
└─────────────┴───────────────────────────────────────────────┘
The paperkey subcommand can be used to create a QR encoded
version of a tape encryption key. The following command sends the output of the
paperkey command to a text file, for easy printing:
proxmox-tape key paperkey <fingerprint> --output-format text > qrkey.txt
Restoring Encryption Keys
You can restore the encryption key from the tape, using the password used to generate the key. First, load the tape you want to restore into the drive. Then run:
# proxmox-tape key restore
Tape Encryption Key Password: ***********
If the password is correct, the key will get imported to the database. Further restore jobs automatically use any available key.
Tape Cleaning
LTO tape drives require regular cleaning. This is done by loading a cleaning cartridge into the drive, which is a manual task for standalone drives.
For tape libraries, cleaning cartridges are identified using special labels starting with letters "CLN". For example, our tape library has a cleaning cartridge inside slot 3:
# proxmox-tape changer status sl3
┌───────────────┬──────────┬────────────┬─────────────┐
│ entry-kind    │ entry-id │ changer-id │ loaded-slot │
╞═══════════════╪══════════╪════════════╪═════════════╡
│ drive         │        0 │ vtape1     │           1 │
├───────────────┼──────────┼────────────┼─────────────┤
│ slot          │        1 │            │             │
├───────────────┼──────────┼────────────┼─────────────┤
│ slot          │        2 │ vtape2     │             │
├───────────────┼──────────┼────────────┼─────────────┤
│ slot          │        3 │ CLN001CU   │             │
├───────────────┼──────────┼────────────┼─────────────┤
│ ...           │      ... │            │             │
└───────────────┴──────────┴────────────┴─────────────┘
To initiate a cleaning operation simply run:
# proxmox-tape clean
This command does the following:
find the cleaning tape (in slot 3)
unload the current media from the drive (back to slot 1)
load the cleaning tape into the drive
run drive cleaning operation
unload the cleaning tape (to slot 3)
WORM Tapes
WORM (write once, read many) tapes are special cartridges that cannot be deleted or overwritten. This may be useful for legal or protection purposes.
If you want to use them, you must use a media pool with a retention policy of keep. Otherwise, a backup job can fail when it tries to erase or overwrite the tape.
Proxmox Backup Server makes no distinction between normal and WORM tapes. To avoid confusion, use a different naming scheme for WORM backups and use dedicated media pools for them. Do not mix WORM and non-WORM tapes in the same media pool.
Example Setups
Here are a few example setups for managing media pools and schedules. This is not an exhaustive list, and there are many more possible combinations of useful settings.
Single Continued Media Set
The most simple setup: always continue the media-set and never expire.
- Allocation policy:
continue
- Retention policy:
keep
This setup has the advantage of being easy to manage and reuses the benefits from deduplication as much as possible. But, it also provides no redundancy, meaning a failure of any single tape would render all backups referring to chunks from that tape unusable.
If you want to start a new media-set manually, you can set the currently writable media of the set either to 'full', or set the location to an off-site vault.
Weekday Scheme
A slightly more complex scheme, where the goal is to have an independent tape or media set for each weekday, for example from Monday to Friday. This can be solved by having a separate media pool for each day, so 'Monday', 'Tuesday', etc.
- Allocation policy:
should be 'mon' for the 'Monday' pool, 'tue' for the Tuesday pool and so on.
- Retention policy:
overwrite
There should be one or more tape-backup jobs for each pool on the corresponding weekday. This scheme is still very manageable with one media set per weekday, and could be moved off-site easily.
Multiple Pools with Different Policies
Complex setups are also possible, with multiple media pools configured with different allocation and retention policies.
An example would be to have two media pools. The first configured with weekly allocation and a few weeks of retention:
- Allocation policy:
mon
- Retention policy:
3 weeks
The second pool configured with yearly allocation that does not expire:
- Allocation policy:
yearly
- Retention policy:
keep
In combination with fitting prune settings and tape backup schedules, this achieves long-term storage of some backups, while keeping the recent backups on smaller media sets that expire roughly every 4 weeks (that is, three plus the current week).
Disaster Recovery
In case of major disasters, important data, or even whole servers might be destroyed or at least damaged up to the point where everything - sometimes including the backup server - has to be restored from a backup. For such cases, the following step-by-step guide will help you to set up the Proxmox Backup Server and restore everything from tape backups.
The following guide will explain the necessary steps using both the web GUI and the command line tools. For an overview of the command line tools, see Command-line Tools.
Setting Up a Datastore
After you set up a new Proxmox Backup Server, as outlined in the Installation chapter, first set up a datastore so a tape can be restored to it:
Go to Administration -> Storage / Disks and make sure that the disk that will be used as a datastore shows up.
Under the Directory or ZFS tabs, you can either choose to create a directory or create a ZFS
zpool, respectively. Here you can also directly add the newly created directory or ZFSzpoolas a datastore.
Alternatively, the proxmox-backup-manager can be used to perform the same tasks. For more information, check the Datastore documentation.
Setting Up the Tape Drive
Make sure you have a properly working tape drive and/or changer matching to medium you want to restore from.
Connect the tape changer(s) and the tape drive(s) to the backup server. These should be detected automatically by Linux. You can get a list of available drives using:
# proxmox-tape drive scan
┌────────────────────────────────┬────────┬─────────────┬────────┐
│ path                           │ vendor │ model       │ serial │
╞════════════════════════════════╪════════╪═════════════╪════════╡
│ /dev/tape/by-id/scsi-12345-sg  │ IBM    │ ULT3580-TD4 │  12345 │
└────────────────────────────────┴────────┴─────────────┴────────┘
You can get a list of available changers with:
# proxmox-tape changer scan
┌─────────────────────────────┬─────────┬──────────────┬────────┐
│ path                        │ vendor  │ model        │ serial │
╞═════════════════════════════╪═════════╪══════════════╪════════╡
│ /dev/tape/by-id/scsi-CC2C52 │ Quantum │ Superloader3 │ CC2C52 │
└─────────────────────────────┴─────────┴──────────────┴────────┘
For more information, please read the chapters on Tape changers and Tape drives.
If you have a tape changer, go to the web interface of the Proxmox Backup Server, go to Tape Backup -> Changers and add it. For examples using the command line, read the chapter on Tape changers. If the changer has been detected correctly by Linux, the changer should show up in the list.
In the web interface, go to Tape Backup -> Drives and add the tape drive that will be used to read the tapes. For examples using the command line, read the chapter on Tape drives. If the tape drive has been detected correctly by Linux, the drive should show up in the list. If the drive also has a tape changer, make sure to select the changer as well and assign it the correct drive number.
Restoring Data From the Tape
The following guide will explain the steps necessary to restore data from a tape, which can be done over either the web GUI or the command line. For details on the command line, read the documentation on the proxmox-tape tool.
To restore data from tapes, do the following:
Insert the first tape (as displayed on the label) into the tape drive or, if a tape changer is available, use the tape changer to insert the tape into the right drive. The web GUI can also be used to load or transfer tapes between tape drives by selecting the changer.
If the backup has been encrypted, the encryption keys need to be restored as well. In the Encryption Keys tab, press Restore Key. For more details or examples that use the command line, read the Encryption Key Management chapter.
The procedure for restoring data is slightly different depending on whether you are using a standalone tape drive or a changer:
For changers, the procedure is simple:
Insert all tapes from the media set you want to restore from.
Click on the changer in the web GUI, click Inventory, make sure Restore Catalog is selected and press OK.
For standalone drives, the procedure would be:
Insert the first tape of the media set.
Click Catalog.
Eject the tape, then repeat the steps for the remaining tapes of the media set.
Go back to Tape Backup. In the Content tab, press Restore and select the desired media set. Choose the snapshot you want to restore, press Next, select the drive and target datastore and press Restore.
By going to the datastore where the data has been restored, under the Content tab you should be able to see the restored snapshots. In order to access the backups from another machine, you will need to configure the access to the backup server. Go to Configuration -> Access Control and either create a new user, or a new API token (API tokens allow easy revocation if the token is compromised). Under Permissions, add the desired permissions, e.g. DatastoreBackup.
You can now perform virtual machine, container or file restores. You now have the following options:
If you want to restore files on Linux distributions that are not based on Proxmox products or you prefer using a command line tool, you can use the proxmox-backup-client, as explained in the Restoring Data chapter. Use the newly created API token to be able to access the data. You can then restore individual files or mount an archive to your system.
If you want to restore virtual machines or containers on a Proxmox VE server, add the datastore of the backup server as storage and go to Backups. Here you can restore VMs and containers, including their configuration. For more information on restoring backups in Proxmox VE, visit the Restore chapter of the Proxmox VE documentation.