Backup Storage
Disk Management
Proxmox Backup Server comes with a set of disk utilities, which are
accessed using the disk subcommand or the web interface. This subcommand
allows you to initialize disks, create various filesystems, and get information
about the disks.
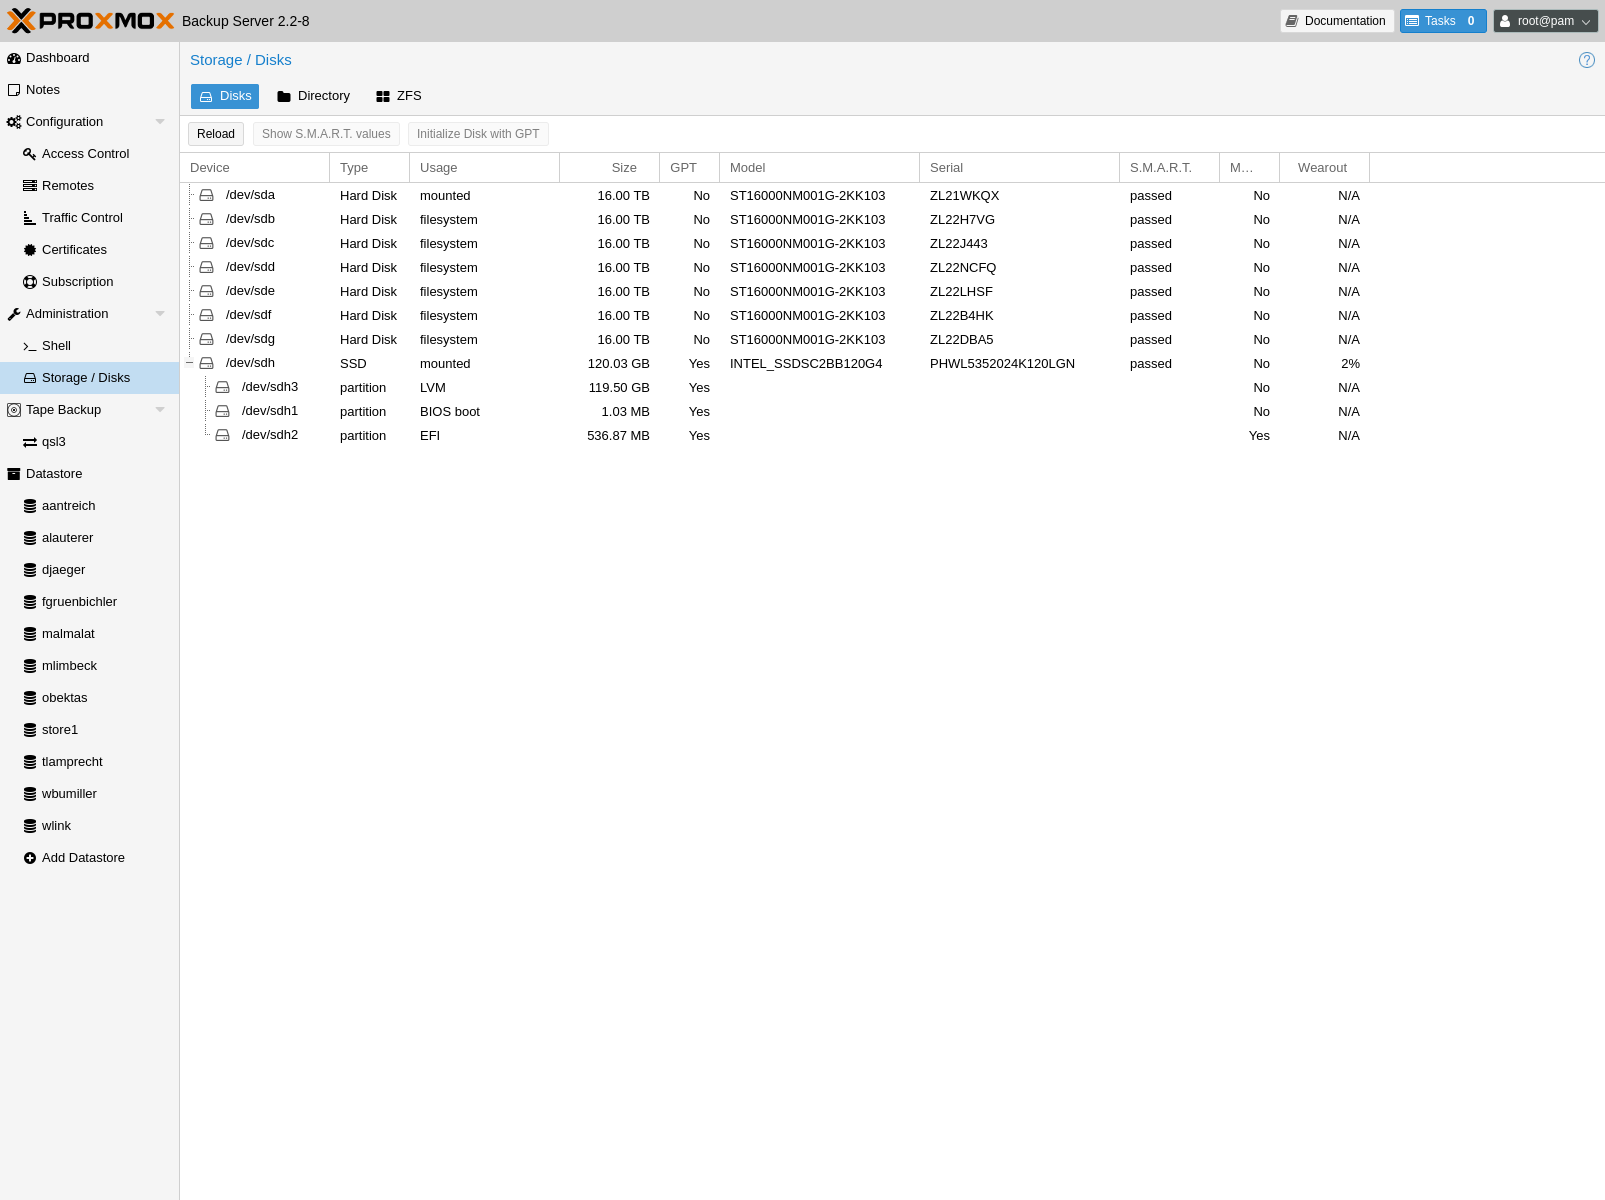
To view the disks connected to the system, navigate to Administration ->
Storage/Disks in the web interface or use the list subcommand of
disk:
# proxmox-backup-manager disk list
┌──────┬────────┬─────┬───────────┬─────────────┬───────────────┬─────────┬────────┐
│ name │ used   │ gpt │ disk-type │        size │ model         │ wearout │ status │
╞══════╪════════╪═════╪═══════════╪═════════════╪═══════════════╪═════════╪════════╡
│ sda  │ lvm    │   1 │ hdd       │ 34359738368 │ QEMU_HARDDISK │       - │ passed │
├──────┼────────┼─────┼───────────┼─────────────┼───────────────┼─────────┼────────┤
│ sdb  │ unused │   1 │ hdd       │ 68719476736 │ QEMU_HARDDISK │       - │ passed │
├──────┼────────┼─────┼───────────┼─────────────┼───────────────┼─────────┼────────┤
│ sdc  │ unused │   1 │ hdd       │ 68719476736 │ QEMU_HARDDISK │       - │ passed │
└──────┴────────┴─────┴───────────┴─────────────┴───────────────┴─────────┴────────┘
To initialize a disk with a new GPT, use the initialize subcommand:
# proxmox-backup-manager disk initialize sdX
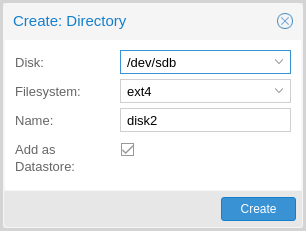
You can create an ext4 or xfs filesystem on a disk using fs
create, or by navigating to Administration -> Storage/Disks -> Directory
in the web interface and creating one from there. The following command creates
an ext4 filesystem and passes the --add-datastore parameter, in order to
automatically create a datastore on the disk. This will
create a datastore at the location /mnt/datastore/store1:
# proxmox-backup-manager disk fs create store1 --disk sdX --filesystem ext4 --add-datastore true
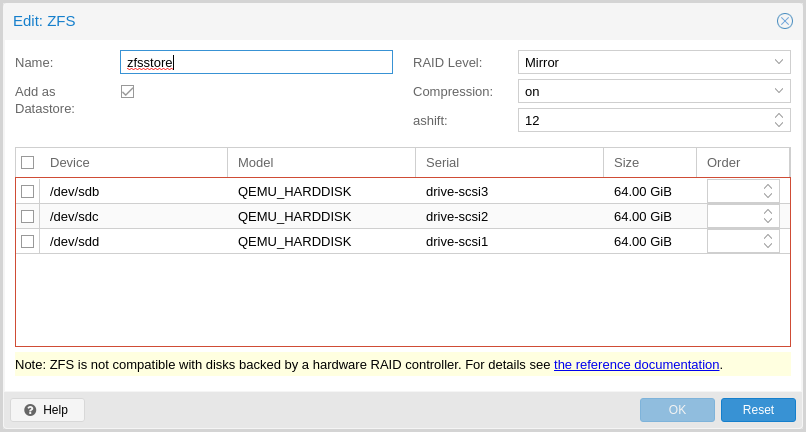
You can also create a zpool with various raid levels from Administration
-> Storage/Disks -> ZFS in the web interface, or by using zpool create. The command
below creates a mirrored zpool using two disks and
mounts it under /mnt/datastore/zpool1:
# proxmox-backup-manager disk zpool create zpool1 --devices sdX,sdY --raidlevel mirror
Note
You can also pass the --add-datastore parameter here, to automatically
create a datastore from the disk.
You can use disk fs list and disk zpool list to keep track of your
filesystems and zpools respectively.
Proxmox Backup Server uses the package smartmontools. This is a set of tools used to monitor and control the S.M.A.R.T. system for local hard disks. If a disk supports S.M.A.R.T. capability, and you have this enabled, you can display S.M.A.R.T. attributes from the web interface or by using the command:
# proxmox-backup-manager disk smart-attributes sdX
Note
This functionality may also be accessed directly through the use of
the smartctl command, which comes as part of the smartmontools package
(see man smartctl for more details).
Datastore
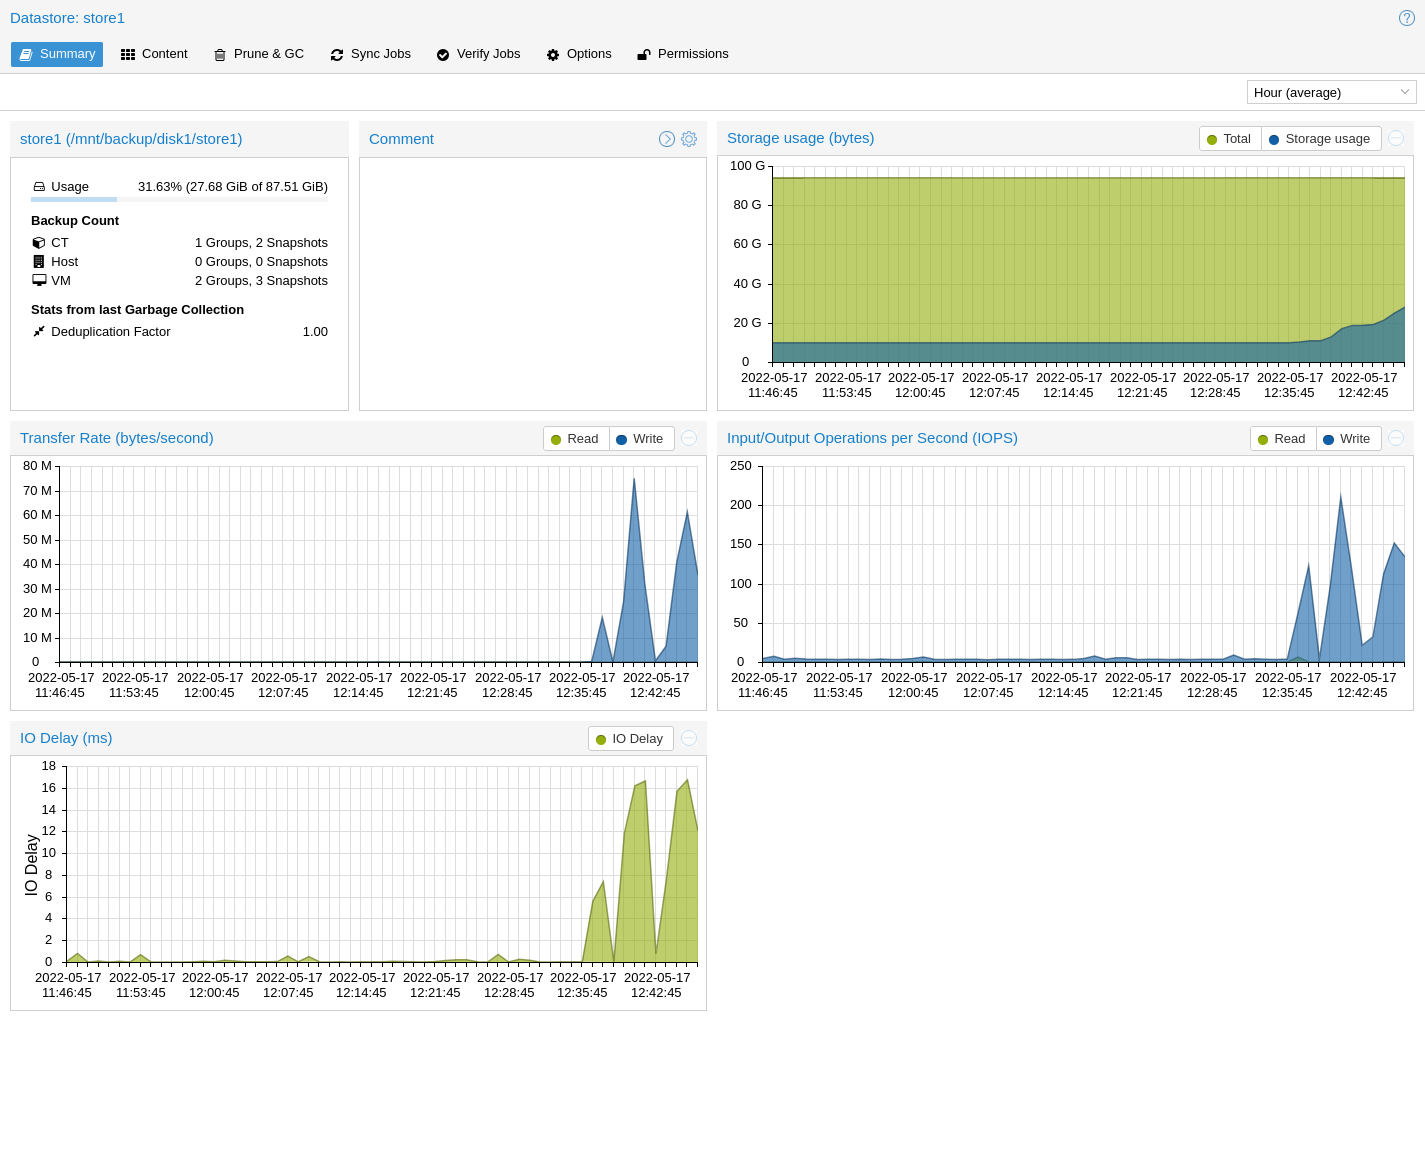
A datastore refers to a location at which backups are stored. The current
implementation uses a directory inside a standard Unix file system (ext4,
xfs or zfs) to store the backup data.
Datastores are identified by a simple ID. You can configure this
when setting up the datastore. The configuration information for datastores
is stored in the file /etc/proxmox-backup/datastore.cfg.
Note
The File Layout requires the file system to support at least 65538
subdirectories per directory. That number comes from the 216
pre-created chunk namespace directories, and the . and .. default
directory entries. This requirement excludes certain filesystems and
filesystem configurations from being supported for a datastore. For example,
ext3 as a whole or ext4 with the dir_nlink feature manually disabled.
Datastore Configuration

You can configure multiple datastores. A minimum of one datastore needs to be
configured. The datastore is identified by a simple name and points to a
directory on the filesystem. Each datastore also has associated retention
settings of how many backup snapshots for each interval of hourly,
daily, weekly, monthly, yearly as well as a time-independent
number of backups to keep in that store. Pruning and Removing Backups and
garbage collection can also be configured to
run periodically, based on a configured schedule (see
Calendar Events) per datastore.
Creating a Datastore
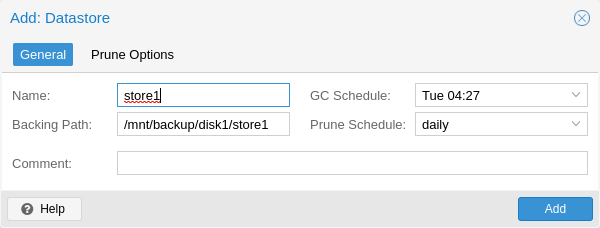
You can create a new datastore from the web interface, by clicking Add Datastore in the side menu, under the Datastore section. In the setup window:
Name refers to the name of the datastore
Backing Path is the path to the directory upon which you want to create the datastore
GC Schedule refers to the time and intervals at which garbage collection runs
Prune Schedule refers to the frequency at which pruning takes place
Prune Options set the amount of backups which you would like to keep (see Pruning and Removing Backups).
Comment can be used to add some contextual information to the datastore.
Alternatively you can create a new datastore from the command line. The
following command creates a new datastore called store1 on
/backup/disk1/store1
# proxmox-backup-manager datastore create store1 /backup/disk1/store1
Removable Datastores
Removable datastores have a backing-device associated with them, they can be
mounted and unmounted. Other than that they behave the same way a normal datastore
would.
They can be created on already correctly formatted partitions, which should be
either ext4 or xfs as with normal datastores, but most modern file
systems supported by the Proxmox Linux kernel should work.
Note
FAT-based file systems do not support the POSIX file ownership concept and have relatively low limits on the number of files per directory. Therefore, creating a datastore is not supported on FAT file systems. Because some external drives are preformatted with such a FAT-based file system, you may need to reformat the drive before you can use it as a backing-device for a removable datastore.
It is also possible to create them on completely unused disks through "Administration" > "Disks / Storage" > "Directory", using this method the disk will be partitioned and formatted automatically for the datastore.
Devices with only one datastore on them will be mounted automatically. Unmounting has
to be done through the UI by clicking "Unmount" on the summary page or using the CLI.
If unmounting fails, the reason is logged in the unmount task log, and the
datastore will stay in maintenance mode unmounting, which prevents any IO
operations. In such cases, the maintenance mode has to be reset manually using:
# proxmox-backup-manager datastore update --maintenance-mode offline
to prevent any IO, or to clear it use:
# proxmox-backup-manager datastore update --delete maintenance-mode
A single device can house multiple datastores, they only limitation is that they are not allowed to be nested.
Removable datastores are created on the the device with the given relative path that is specified
on creation. In order to use a datastore on multiple PBS instances, it has to be created on one,
and added with Reuse existing datastore checked on the others. The path you set on creation
is how multiple datastores on a single device are identified. So when adding on a new PBS instance,
it has to match what was set on creation.
# proxmox-backup-manager datastore unmount store1
both will wait for any running tasks to finish and unmount the device.
All removable datastores are mounted under /mnt/datastore/<name>, and the specified path refers to the path on the device.
All datastores present on a device can be listed using proxmox-backup-debug.
# proxmox-backup-debug inspect device /dev/...
Verify, Prune and Garbage Collection jobs are skipped if the removable datastore is not mounted when they are scheduled. Sync jobs start, but fail with an error saying the datastore was not mounted. The reason is that syncs not happening as scheduled should at least be noticeable.
Setups that rely on unmount-on-done (see Sync Jobs) have no natural
point to run garbage collection, since the device is detached right after the
sync finishes. Enabling the gc-on-unmount option on the datastore makes
the unmount trigger a garbage collection first and wait for it to complete
before actually unmounting. If a garbage collection run is already in
progress when the unmount fires (for example from an overlapping scheduled
GC job), that run is waited on instead.
Datastores with S3 Backend
Proxmox Backup Server supports S3 compatible object stores as storage backend for datastores. For this, an S3 endpoint needs to be set-up under "Configuration" > "Remotes" > "S3 Endpoints".
Important
Keep in mind that operating as S3 backed object store might cause additional costs. Providers might charge you for storage space and API requests performed to the buckets, egress and bandwidth fees might be charged as well. Therefore, monitoring of these values and eventual costs is highly recommended.
In the endpoint configuration, provide the REST API endpoint for the object store. The endpoint
is provider dependent and allows for the bucket and region templating. For example, configuring
the endpoint as e.g. {{bucket}}.s3.{{region}}.amazonaws.com will be expanded to
my-pbs-bucket.s3.eu-central-1.amazonaws.com with a configured bucket of name my-pbs-bucket
located in region eu-central-1.
The bucket name is part of the datastore backend configuration rather than the endpoint configuration, as the same endpoint might be reused for multiple bucket. Objects placed in the bucket are prefixed by the datastore name, therefore it is possible to create multiple datastores using the same bucket.
Note
Proxmox Backup Server does not handle bucket creation and access control. The bucket used to store the datastore's objects as well as the access key have to be setup beforehand in your S3 provider interface. The Proxmox Backup Server acts as client and requires permissions to get, put list and delete objects in the bucket.
Most providers allow to access buckets either using a vhost style addressing, the bucket name being part of the endpoint address, or via path style addressing, the bucket name being the prefix to the path components of requests. Proxmox Backup Server supports both styles, favoring the vhost style urls over the path style. To use path style addresses, set the corresponding configuration flag.
Proxmox Backup Server does not support plain text communication with the S3 API, all communication is encrypted using HTTPS in transit. Therefore, for self-hosted S3 object stores using a self-signed certificate, the matching fingerprint has to be provided to the endpoint configuration. Otherwise the client refuses connections to the S3 object store.
The following example shows the setup of a new s3 endpoint configuration:
# proxmox-backup-manager s3 endpoint create my-s3-ep --access-key 'my-access-key' --secret-key 'my-secret-key' --endpoint '{{bucket}}.s3.{{region}}.amazonaws.com' --region eu-central-1
To list your s3 endpoint configuration, run:
# proxmox-backup-manager s3 endpoint list
A new datastore with S3 backend can be created using one of the configured S3 endpoints. Although storing all contents on the S3 object store, the datastore requires nevertheless a local persistent cache, used to increase performance and reduce the number of requests to the backend. For this, a local filesystem path has to be provided during datastore creation, just like for regular datastore setup. However, unlike for regular datastores the size of the local cache can be limited, 64 GiB to 128 GiB are recommended given that cached datastore contents include also data chunks. Best is to use a dedicated disk, partition or ZFS dataset with quota as local cache. Note however, it is not possible to use a pre-existing regular datastore for this. Further, the use of volatile memory only for the cache is currently not possible.
To setup a new datastore called my-s3-store placed in a bucket called pbs-s3-bucket, run:
# proxmox-backup-manager datastore create my-s3-store /mnt/datastore/my-s3-store-cache --backend type=s3,client=my-s3-ep,bucket=pbs-s3-bucket
A datastore cannot be shared between multiple Proxmox Backup Server instances, only one instance can
operate on the datastore at a time. However, datastore contents used on an instance which is no
longer available can be reused on a fresh installation. To recreate the datastore, you must pass the
reuse-datastore and overwrite-in-use flags. Since the datastore name is used as prefix, the
same datastore name must be used.
# proxmox-backup-manager datastore create my-s3-store /mnt/datastore/my-new-s3-store-cache --backend type=s3,client=my-s3-ep,bucket=pbs-s3-bucket --reuse-datastore true --overwrite-in-use true
Note
If your S3 object store runs out of space while performing write operation to it, most
likely cleanup operations such as cleaning up of contents within a snapshot directory will fail
as well. The recommended procedure is to cleanup any stray objects corresponding to this snapshot
on the S3 object store manually and refresh the contents via an S3 refresh, either via the
CLI or UI.
S3 Datastore Backend Configuration Examples
The following shows example configurations for some typical S3 object store providers as excerpts
(data relevant to S3 config only) from /etc/proxmox-backup/s3.cfg and
/etc/proxmox-backup/datastore.cfg:
Self hosted S3 object store with Ceph Rados Gateway using plain IP address, custom port, self-signed certificate and path-style bucket:
# cat /etc/proxmox-backup/s3.cfg

s3-endpoint: ceph-s3-rados-gw
     access-key XXXXXXXXXXXXXXXXXXXX
     endpoint 172.16.0.200
     fingerprint XX:XX:XX:XX:XX:XX:XX:XX:XX:XX:XX:XX:XX:XX:XX:XX:XX:XX:XX:XX:XX:XX:XX:XX:XX:XX:XX:XX:XX:XX:XX:XX
     path-style true
     port 7480
     secret-key XXXXXXXXXXXXXXXXXXXXXXXXXXXXXXXXXXXXXXXX


# cat /etc/proxmox-backup/datastore.cfg

datastore: ceph-s3-rgw-store
     backend bucket=pbs-ceph-bucket,client=ceph-s3-rados-gw,type=s3
     path /mnt/datastore/ceph-s3-rgw-store-local-cache
AWS S3 with vhost style bucket addressing, using bucket name and region templating for the endpoint url:
# cat /etc/proxmox-backup/s3.cfg

s3-endpoint: aws-s3
     access-key XXXXXXXXXXXXXXXXXXXX
     endpoint {{bucket}}.s3.{{region}}.amazonaws.com
     region eu-central-1
     secret-key XXXXXXXXXXXXXXXXXXXXXXXXXXXXXXXXXXXXXXXX

# cat /etc/proxmox-backup/datastore.cfg

datastore: aws-s3-store
     backend bucket=pbs-s3-bucket,client=aws-s3,type=s3
     path /mnt/datastore/aws-s3-store-local-cache
Cloudflare R2 with path style bucket addressing, note that region must be set to auto as
otherwise request authentication might fail:
# cat /etc/proxmox-backup/s3.cfg

s3-endpoint: cloudflare-r2
     access-key XXXXXXXXXXXXXXXXXXXXXXXXXXXXXXXX
     endpoint XXXXXXXXXXXXXXXXXXXXXXXXXXXXXXXX.r2.cloudflarestorage.com
     path-style true
     region auto
     secret-key XXXXXXXXXXXXXXXXXXXXXXXXXXXXXXXXXXXXXXXXXXXXXXXXXXXXXXXXXXXXXXXX

 # cat /etc/proxmox-backup/datastore.cfg

 datastore: r2-s3-store
     backend bucket=pbs-r2-bucket,client=cloudflare-r2,type=s3
     path /mnt/datastore/r2-s3-store-local-cache
Managing Datastores
To list existing datastores from the command line, run:
# proxmox-backup-manager datastore list
┌────────┬──────────────────────┬─────────────────────────────┐
│ name   │ path                 │ comment                     │
╞════════╪══════════════════════╪═════════════════════════════╡
│ store1 │ /backup/disk1/store1 │ This is my default storage. │
└────────┴──────────────────────┴─────────────────────────────┘
You can change the garbage collection and prune settings of a datastore, by
editing the datastore from the GUI or by using the update subcommand. For
example, the below command changes the garbage collection schedule using the
update subcommand and prints the properties of the datastore with the
show subcommand:
# proxmox-backup-manager datastore update store1 --gc-schedule 'Tue 04:27'
# proxmox-backup-manager datastore show store1
┌────────────────┬─────────────────────────────┐
│ Name           │ Value                       │
╞════════════════╪═════════════════════════════╡
│ name           │ store1                      │
├────────────────┼─────────────────────────────┤
│ path           │ /backup/disk1/store1        │
├────────────────┼─────────────────────────────┤
│ comment        │ This is my default storage. │
├────────────────┼─────────────────────────────┤
│ gc-schedule    │ Tue 04:27                   │
├────────────────┼─────────────────────────────┤
│ keep-last      │ 7                           │
├────────────────┼─────────────────────────────┤
│ prune-schedule │ daily                       │
└────────────────┴─────────────────────────────┘
Finally, it is possible to remove the datastore configuration:
# proxmox-backup-manager datastore remove store1
Note
The above command removes only the datastore configuration. It does not delete any data from the underlying directory.
File Layout
After creating a datastore, the following default layout will appear:
# ls -arilh /backup/disk1/store1
276493 -rw-r--r-- 1 backup backup       0 Jul  8 12:35 .lock
276490 drwxr-x--- 1 backup backup 1064960 Jul  8 12:35 .chunks
.lock is an empty file used for process locking.
The .chunks directory contains folders, starting from 0000 and increasing in hexadecimal values until ffff. These directories will store the chunked data, categorized by checksum, after a backup operation has been executed.
# ls -arilh /backup/disk1/store1/.chunks
545824 drwxr-x--- 2 backup backup 4.0K Jul  8 12:35 ffff
545823 drwxr-x--- 2 backup backup 4.0K Jul  8 12:35 fffe
415621 drwxr-x--- 2 backup backup 4.0K Jul  8 12:35 fffd
415620 drwxr-x--- 2 backup backup 4.0K Jul  8 12:35 fffc
353187 drwxr-x--- 2 backup backup 4.0K Jul  8 12:35 fffb
344995 drwxr-x--- 2 backup backup 4.0K Jul  8 12:35 fffa
144079 drwxr-x--- 2 backup backup 4.0K Jul  8 12:35 fff9
144078 drwxr-x--- 2 backup backup 4.0K Jul  8 12:35 fff8
144077 drwxr-x--- 2 backup backup 4.0K Jul  8 12:35 fff7
...
403180 drwxr-x--- 2 backup backup 4.0K Jul  8 12:35 000c
403179 drwxr-x--- 2 backup backup 4.0K Jul  8 12:35 000b
403177 drwxr-x--- 2 backup backup 4.0K Jul  8 12:35 000a
402530 drwxr-x--- 2 backup backup 4.0K Jul  8 12:35 0009
402513 drwxr-x--- 2 backup backup 4.0K Jul  8 12:35 0008
402509 drwxr-x--- 2 backup backup 4.0K Jul  8 12:35 0007
276509 drwxr-x--- 2 backup backup 4.0K Jul  8 12:35 0006
276508 drwxr-x--- 2 backup backup 4.0K Jul  8 12:35 0005
276507 drwxr-x--- 2 backup backup 4.0K Jul  8 12:35 0004
276501 drwxr-x--- 2 backup backup 4.0K Jul  8 12:35 0003
276499 drwxr-x--- 2 backup backup 4.0K Jul  8 12:35 0002
276498 drwxr-x--- 2 backup backup 4.0K Jul  8 12:35 0001
276494 drwxr-x--- 2 backup backup 4.0K Jul  8 12:35 0000
276489 drwxr-xr-x 3 backup backup 4.0K Jul  8 12:35 ..
276490 drwxr-x--- 1 backup backup 1.1M Jul  8 12:35 .
Once you've uploaded some backups or created namespaces, you may see the backup type (ct, vm, host) and the start of the namespace hierarchy (ns).
Backup Namespaces
A datastore can host many backups, as long as the underlying storage is large enough and provides the performance required for a user's use case. However, without any hierarchy or separation, it's easy to run into naming conflicts, especially when using the same datastore for multiple Proxmox VE instances or multiple users.
The backup namespace hierarchy allows you to clearly separate different users or backup sources in general, avoiding naming conflicts and providing a well-organized backup content view.
Each namespace level can host any backup type, CT, VM or Host, but also other namespaces, up to a depth of 8 levels, where the root namespace is the first level.
Namespace Permissions
You can make the permission configuration of a datastore more fine-grained by setting permissions only on a specific namespace.
To view a datastore, you need a permission that has at least an AUDIT, MODIFY, READ or BACKUP privilege on any namespace it contains.
To create or delete a namespace, you require the modify privilege on the parent namespace. Thus, to initially create namespaces, you need to have a permission with an access role that includes the MODIFY privilege on the datastore itself.
For backup groups, the existing privilege rules still apply. You either need a privileged enough permission or to be the owner of the backup group; nothing changed here.
Moving Namespaces and Groups
Backup groups can be moved between namespaces within the same datastore. This is useful for reorganizing backup hierarchies without having to re-run backups.
A single group can be moved with group move. To relocate an entire
namespace subtree (including all child namespaces and their groups), use
namespace move.
# proxmox-backup-client group move <type>/<id> --ns <source> --target-ns <target> --repository <repo>
# proxmox-backup-client namespace move <source> --target-ns <target> --repository <repo>
If the target namespace already exists, groups are moved into it. When a
group with the same type and ID already exists in the target and
merge-groups is enabled, the snapshots are merged into the existing
group provided:
both groups have the same owner
the oldest source snapshot is newer than the newest target snapshot
Groups that cannot be merged or locked are skipped and reported in the
task log. They remain at the source and can be retried individually with
group move.
Note
With defaults, namespace move merges into existing target groups
(merge-groups=true) and removes source namespaces once they are empty
(delete-source=true). Pass --merge-groups false or
--delete-source false to opt out.
Optional parameters for namespace move:
merge-groupsAllow merging snapshots into groups that already exist in the target namespace with the same type and ID. Defaults to true.
max-depthLimits how many levels of child namespaces below the source are included. When not set, the entire subtree is moved.
delete-sourceControls whether the source namespace directories are removed after all groups have been moved out. Defaults to true. Set to false to keep the (now empty) source namespace structure.
Required privileges:
group move:DATASTORE_PRUNEon the source namespace andDATASTORE_BACKUPon the target namespace, plus ownership of the backup group; orDATASTORE_MODIFYon both.namespace move:DATASTORE_MODIFYon the parent of both the source and the target namespace.
Options
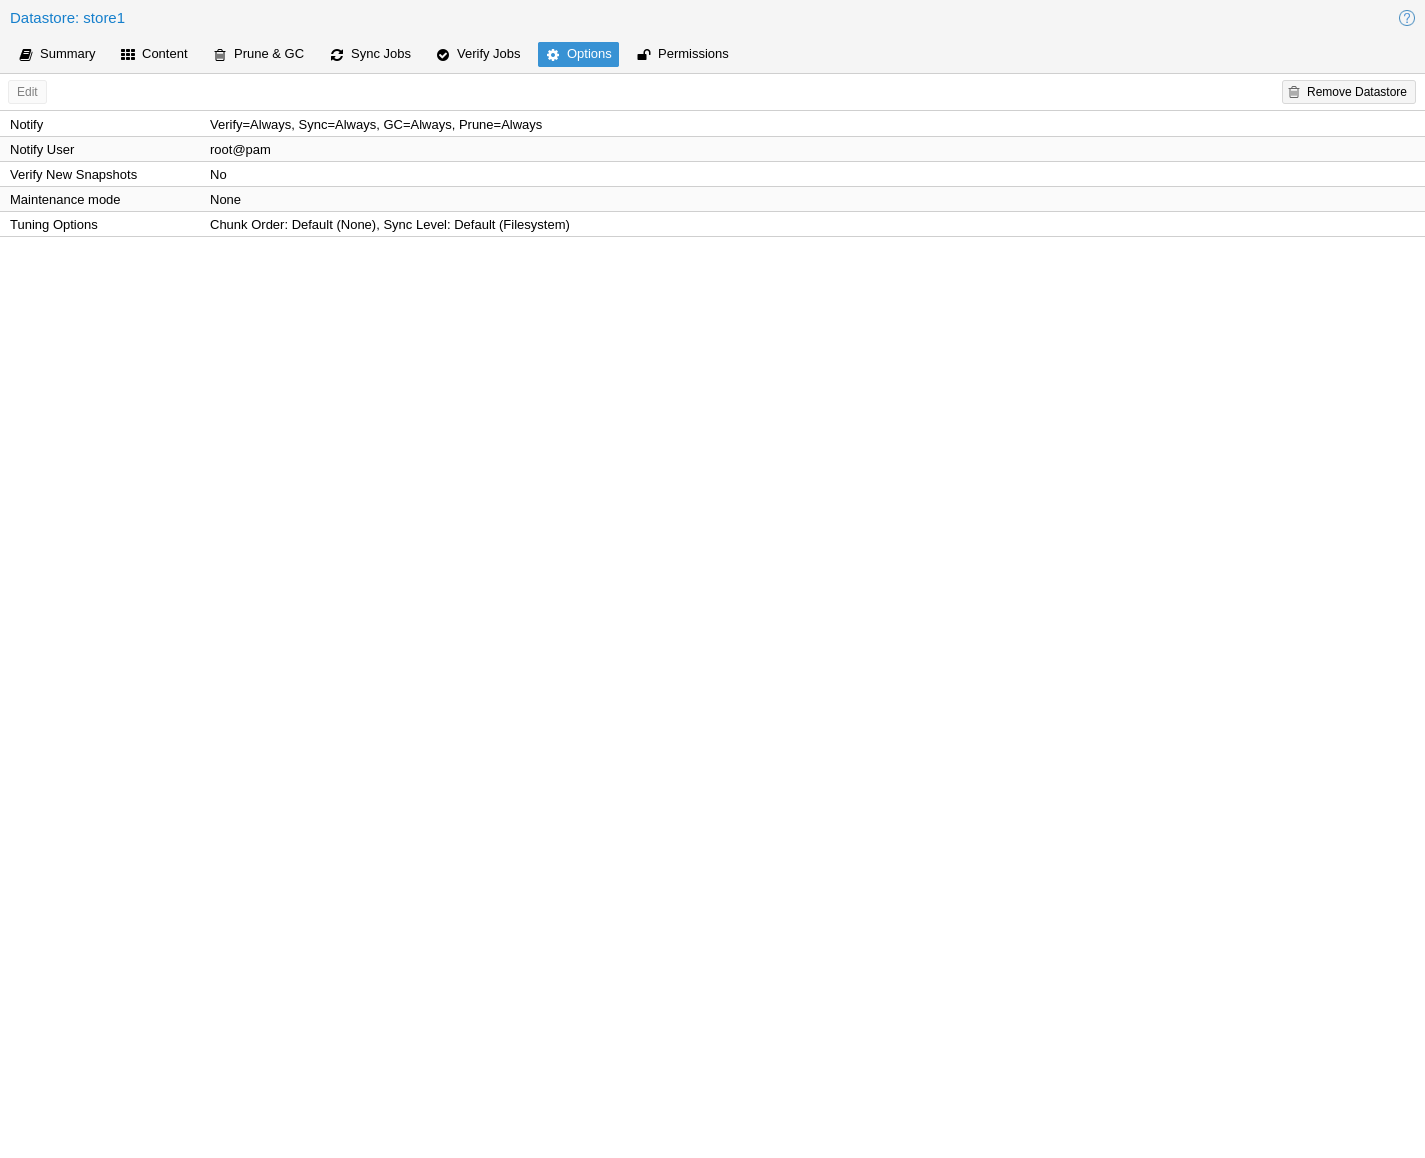
There are a few per-datastore options:
Verification of incoming backups
Tuning
There are some tuning related options for the datastore that are more advanced:
chunk-order: Chunk order for verify & tape backup:You can specify the order in which Proxmox Backup Server iterates the chunks when doing a verify or backing up to tape. The two options are:
inode (default): Sorts the chunks by inode number of the filesystem before iterating over them. This should be fine for most storages, especially spinning disks.
none Iterates the chunks in the order they appear in the index file (.fidx/.didx). While this might slow down iterating on many slow storages, on very fast ones (for example: NVMEs) the collecting and sorting can take more time than gained through the sorted iterating. This option can be set with:
# proxmox-backup-manager datastore update <storename> --tuning 'chunk-order=none'
sync-level: Datastore fsync level:You can set the level of syncing on the datastore for chunks, which influences the crash resistance of backups in case of a powerloss or hard shutoff. There are currently three levels:
none : Does not do any syncing when writing chunks. This is fast and normally OK, since the kernel eventually flushes writes onto the disk. The kernel sysctls dirty_expire_centisecs and dirty_writeback_centisecs are used to tune that behaviour, while the default is to flush old data after ~30s.
filesystem (default): This triggers a
syncfs(2)after a backup, but before the task returns OK. This way it is ensured that the written backups are on disk. This is a good balance between speed and consistency. Note that the underlying storage device still needs to protect itself against powerloss to flush its internal ephemeral caches to the permanent storage layer.file With this mode, a fsync is triggered on every chunk insertion, which makes sure each and every chunk reaches the disk as soon as possible. While this reaches the highest level of consistency, for many storages (especially slower ones) this comes at the cost of speed. For many users the filesystem mode is better suited, but for very fast storages this mode can be OK.
This can be set with:
# proxmox-backup-manager datastore update <storename> --tuning 'sync-level=filesystem'
gc-atime-safety-check: Datastore GC atime update safety check: You can explicitly enable or disable the atime update safety check performed on datastore creation and garbage collection. This checks if atime updates are handled as expected by garbage collection and therefore avoids the risk of data loss by unexpected filesystem behavior. It is recommended to set this to enabled, which is also the default value.gc-atime-cutoff: Datastore GC atime cutoff for chunk cleanup: This allows to set the cutoff for which a chunk is still considered in-use during phase 2 of garbage collection (given no older writers). If theatimeof the chunk is outside the range, it will be removed.gc-cache-capacity: Datastore GC least recently used cache capacity: Allows to control the cache capacity used to keep track of chunks for which the access time has already been updated during phase 1 of garbage collection. This avoids multiple updates and increases GC runtime performance. Higher values can reduce GC runtime at the cost of increase memory usage, setting the value to 0 disables caching. The given value sets the number of available cache slots, 1048576 (= 1024 * 1024) being the default, 8388608 (= 8192 * 1024) the maximum value.default-verification-workersanddefault-verification-readers: Define the default number of threads used for verification and reading of chunks, respectively. By default, 4 threads are used for verification and 1 thread is used for reading.
If you want to set multiple tuning options simultaneously, you can separate them with a comma, like this:
# proxmox-backup-manager datastore update <storename> --tuning 'sync-level=filesystem,chunk-order=none'
Ransomware Protection & Recovery
Ransomware is a type of malware that encrypts files until a ransom is paid. Proxmox Backup Server includes features that help mitigate and recover from ransomware attacks by offering off-server and off-site synchronization and easy restoration from backups.
Built-in Protection
Proxmox Backup Server does not rewrite data for existing blocks. This means that a compromised Proxmox VE host or any other compromised system that uses the client to back up data cannot corrupt or modify existing backups in any way.
The 3-2-1 Rule with Proxmox Backup Server
The 3-2-1 rule is simple but effective in protecting important data from all sorts of threats, be it fires, natural disasters or attacks on your infrastructure by adversaries. In short, the rule states that one should create 3 backups on at least 2 different types of storage media, of which 1 copy is kept off-site.
Proxmox Backup Server provides tools for storing extra copies of backups in remote locations and on various types of media.
By setting up a remote Proxmox Backup Server, you can take advantage of the remote sync jobs feature and easily create off-site copies of your backups. This is recommended, since off-site instances are less likely to be infected by ransomware in your local network. You can configure sync jobs to not remove snapshots if they vanished on the remote-source to avoid that an attacker that took over the source can cause deletions of backups on the target hosts. If the source-host became victim of a ransomware attack, there is a good chance that sync jobs will fail, triggering an error notification.
It is also possible to create tape backups as a second storage medium. This way, you get an additional copy of your data on a different storage medium designed for long-term storage. Additionally, it can easily be moved around, be it to an off-site location or, for example, into an on-site fireproof vault for quicker access.
Restrictive User & Access Management
Proxmox Backup Server offers a comprehensive and fine-grained user and access management system. The Datastore.Backup privilege, for example, allows only to create, but not to delete or alter existing backups.
The best way to leverage this access control system is to:
Use separate API tokens for each host or Proxmox VE Cluster that should be able to back data up to a Proxmox Backup Server.
Configure only minimal permissions for such API tokens. They should only have a single permission that grants the DataStore access role on a very narrow ACL path that is restricted to a specific namespace on a specific datastore, for example /datastore/tank/pve-abc-cluster.
Tip
One best practice to protect against ransomware is not to grant delete permissions, but to perform backup pruning directly on Proxmox Backup Server using prune jobs.
Please note that the same also applies for sync jobs. By limiting a sync user's or an access token's right to only write backups, not delete them, compromised clients cannot delete existing backups.
Ransomware Detection
A Proxmox Backup Server might still get compromised within insecure networks, if physical access to the server is attained, or due to weak or insufficiently protected credentials. If that happens, and your on-site backups are encrypted by ransomware, the SHA-256 checksums of the backups will not match the previously recorded ones anymore, hence, restoring the backup will fail.
To detect ransomware inside a compromised guest, it is recommended to frequently test restoring and booting backups. Make sure to restore to a new guest and not to overwrite your current guest. In the case of many backed-up guests, it is recommended to automate this restore testing. If this is not possible, restoring random samples from the backups periodically (for example, once a week or month), is advised'.
In order to be able to react quickly in case of a ransomware attack, it is recommended to regularly test restoring from your backups. Make sure to restore to a new guest and not to overwrite your current guest. Restoring many guests at once can be cumbersome, which is why it is advisable to automate this task and verify that your automated process works. If this is not feasible, it is recommended to restore random samples from your backups. While creating backups is important, verifying that they work is equally important. This ensures that you are able to react quickly in case of an emergency and keeps disruption of your services to a minimum.
Verification jobs can also assist in detecting a ransomware presence on a Proxmox Backup Server. Since verification jobs regularly check if all backups still match the checksums on record, they will start to fail if a ransomware starts to encrypt existing backups. Please be aware, that an advanced enough ransomware could circumvent this mechanism. Hence, consider verification jobs only as an additional, but not a sufficient protection measure.
General Prevention Methods and Best Practices
It is recommended to take additional security measures, apart from the ones offered by Proxmox Backup Server. These recommendations include, but are not limited to:
Keeping the firmware and software up-to-date to patch exploits and vulnerabilities (such as Spectre or Meltdown).
Following safe and secure network practices, for example using logging and monitoring tools and dividing your network so that infrastructure traffic and user or even public traffic are separated, for example by setting up VLANs.
Set up a long-term retention. Since some ransomware might lay dormant a couple of days or weeks before starting to encrypt data, it can be that older, existing backups are compromised. Thus, it is important to keep at least a few backups over longer periods of time.
For more information on how to avoid ransomware attacks and what to do in case of a ransomware infection, see official government recommendations like CISA's (USA) guide or EU resources like ENSIA's Threat Landscape for Ransomware Attacks or nomoreransom.org.