Maintenance Tasks
Pruning
Prune lets you specify which backup snapshots you want to keep, removing others. When pruning a snapshot, only the snapshot metadata (manifest, indices, blobs, log and notes) is removed. The chunks containing the actual backup data and previously referenced by the pruned snapshot, have to be removed by a garbage collection run.
Caution
Take into consideration that sensitive information stored in a given data chunk will outlive pruned snapshots and remain present in the datastore as long as referenced by at least one backup snapshot. Further, even if no snapshot references a given chunk, it will remain present until removed by the garbage collection.
Moreover, file-level backups created using the change detection mode
metadata can reference backup chunks containing files which have vanished
since the previous backup. These files might still be accessible by reading
the chunks raw data (client or server side).
To remove chunks containing sensitive data, prune any snapshot made while the
data was part of the backup input and run a garbage collection. Further, if
using file-based backups with change detection mode metadata,
additionally prune all snapshots since the sensitive data was no longer part
of the backup input and run a garbage collection.
The no longer referenced chunks will then be marked for deletion on the next garbage collection run and removed by a subsequent run after the grace period.
The following retention options are available for pruning:
keep-last <N>Keep the last
<N>backup snapshots.keep-hourly <N>Keep backups for the last
<N>hours. If there is more than one backup for a single hour, only the latest is retained. Hours without backups do not count.keep-daily <N>Keep backups for the last
<N>days. If there is more than one backup for a single day, only the latest is retained. Days without backups do not count.keep-weekly <N>Keep backups for the last
<N>weeks. If there is more than one backup for a single week, only the latest is retained. Weeks without backup do not count.Note
Weeks start on Monday and end on Sunday. The software uses the ISO week date system and handles weeks at the end of the year correctly.
keep-monthly <N>Keep backups for the last
<N>months. If there is more than one backup for a single month, only the latest is retained. Months without backups do not count.keep-yearly <N>Keep backups for the last
<N>years. If there is more than one backup for a single year, only the latest is retained. Years without backups do not count.
The retention options are processed in the order given above. Each option only covers backups within its time period. The next option does not take care of already covered backups. It will only consider older backups.
Old unfinished or incomplete backups will be removed by the prune command, unless they are newer than the last successful backup. In this case, the last failed backup is retained.
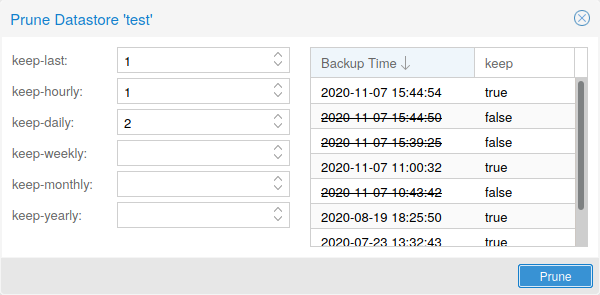
Prune Simulator
You can use the built-in prune simulator to explore the effect of different retention options with various backup schedules.
Prune Jobs
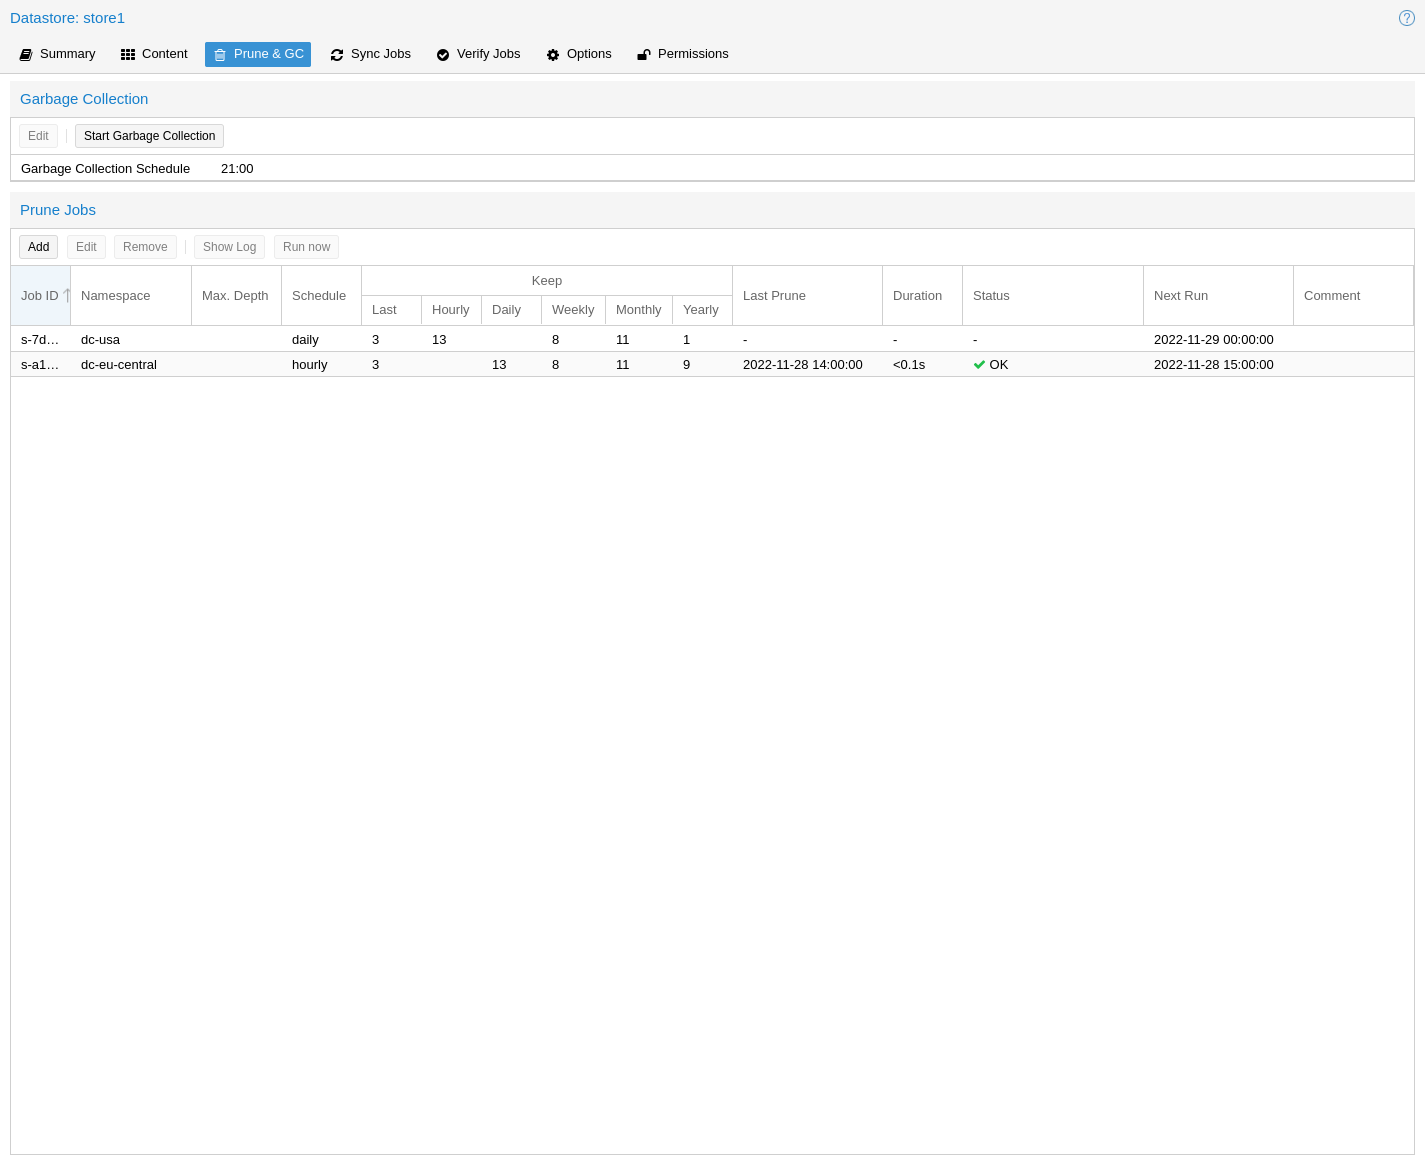
Prune jobs are configured to periodically prune a datastore or a subset of it.
You can manage prune jobs in the web interface, from the Prune & GC tab of
the Datastore panel or from that of the Datastore itself. Alternatively,
you can manage them with the proxmox-backup-manager prune-job command. The
configuration information for prune jobs is stored at
/etc/proxmox-backup/prune.cfg. To create a new prune job, click the add
button in the GUI, or use the manager CLI's create subcommand. After
creating a prune job, you can either start it manually from the GUI or provide
it with a schedule (see Calendar Events) to run regularly.
Each prune job has settings for retention, limitation of scope and frequency.
store <datastore>The datastore you want to run this prune job on.
ns <namespace>Limit the prune job to a specific namespace.
max-depth <N>Configure the namespace depth it should prune from below the configured namespace. For example, 0 to only prune the backup groups available directly on the configured namespace itself. Omit the parameter to scan to the full depth below.
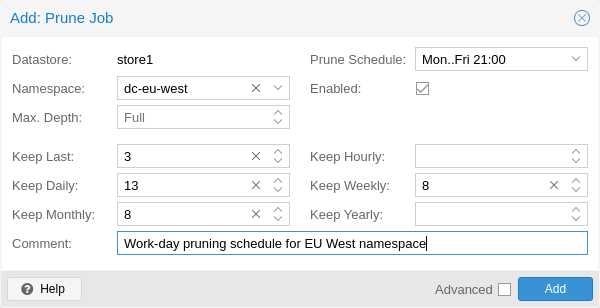
scheduleConfigure a calendar event interval for when to automatically trigger this job. You can omit this if you want to trigger a job only manually.
keep-XSee the description of the various retention options above.
disableSet to disable a job temporarily while keeping its settings.
commentYou can add a short comment for a job, for example about it intentions.
Manual Pruning
To manually prune a specific backup group, you can use
proxmox-backup-client's prune subcommand, discussed in
Pruning and Removing Backups, or navigate to the Content tab of the datastore and
click the scissors icon in the Actions column of the relevant backup group.
Retention Settings Example
The backup frequency and retention of old backups may depend on how often data changes and how important an older state may be in a specific workload. When backups act as a company's document archive, there may also be legal requirements for how long backup snapshots must be kept.
For this example, we assume that you are doing daily backups, have a retention period of 10 years, and the period between backups stored gradually grows.
keep-last:
3- even if only daily backups, an admin may want to create an extra one just before or after a big upgrade. Setting keep-last ensures this.keep-hourly: not set - for daily backups this is not relevant. You cover extra manual backups already, with keep-last.
keep-daily:
13- together with keep-last, which covers at least one day, this ensures that you have at least two weeks of backups.keep-weekly:
8- ensures that you have at least two full months of weekly backups.keep-monthly:
11- together with the previous keep settings, this ensures that you have at least a year of monthly backups.keep-yearly:
9- this is for the long term archive. As you covered the current year with the previous options, you would set this to nine for the remaining ones, giving you a total of at least 10 years of coverage.
We recommend that you use a higher retention period than is minimally required by your environment; you can always reduce it if you find it is unnecessarily high, but you cannot recreate backup snapshots from the past.
Garbage Collection
Garbage collection (GC) is the process that frees up space in a datastore by deleting all unused backup chunks from chunk storage. GC completes the pruning of backup snapshots, which deletes only the metadata, not the underlying backup data.
It's recommended to setup a schedule to ensure that unused space is cleaned up periodically. For most setups a weekly schedule provides a good interval to start.
GC Background
In Proxmox Backup Server, backup data is not saved directly, but rather as chunks that are referred to by the indexes of each backup snapshot. This approach enables reuse of chunks through deduplication, among other benefits that are detailed in the Technical Overview.
When deleting a backup snapshot, Proxmox Backup Server cannot directly remove the chunks associated with it because other backups, even ones that are still running, may have references to those chunks. To avoid excessive load and slow performance, the whole datastore cannot be locked to scan all other indexes for references to the same chunks on every snapshot deletion. Moreover, locking the entire datastore is not feasible because new backups would be blocked until the deletion process was complete.
Therefore, Proxmox Backup Server uses a garbage collection (GC) process to identify and remove the unused backup chunks that are no longer needed by any snapshot in the datastore. The GC process is designed to efficiently reclaim the space occupied by these chunks with low impact on the performance of the datastore or interfering with other backups.
The garbage collection (GC) process is performed per datastore and is split into two phases:
Phase one (Mark):
All index files are read, and the access time (
atime) of the referenced chunk files is updated.Phase two (Sweep):
The task iterates over all chunks and checks their file access time against a cutoff time. The cutoff time is given by either the oldest backup writer instance, if present, or 24 hours and 5 minutes before the start of the garbage collection.
Garbage collection considers chunk files with access time older than the cutoff time to be neither referenced by any backup snapshot's index, nor part of any currently running backup job. Therefore, these chunks can safely be deleted.
Chunks within the grace period will not be deleted and logged at the end of the garbage collection task as Pending removals.
Note
The grace period for backup chunk removal is not arbitrary, but stems
from the fact that filesystems are typically mounted with the relatime
option by default. This results in better performance by only updating the
atime property if a file has been modified since the last access or the
last access has been at least 24 hours ago.
Manually Starting GC
You can monitor and run garbage collection on the
Proxmox Backup Server using the garbage-collection subcommand of
proxmox-backup-manager. You can use the start subcommand to manually
start garbage collection on an entire datastore and the status subcommand to
see attributes relating to the garbage collection.
This functionality can also be accessed in the web UI using the Start Garbage Collection button found in each datastore's Prune & GC tab.
Scheduled GC
Normally, datastore admins don't want to bother triggering GC's manually. That's why you can configure a schedule to let Proxmox Backup Server handle it.
Setting or editing a datastore's GC schedule can be either done by using the
proxmox-backup-manager datastore update <datastore> --gc-schedule <schedule>
CLI command or the edit window in the web UI in each datastore's Prune & GC
tab.
The GC scheduling uses the Calendar Events format.
Tip
You can disable automatic GC runs by clearing the schedule by either
clearing the content of the field in the web UI or using the
proxmox-backup-manager datastore update <datastore> --delete gc-schedule
CLI command. This might be, for example, useful during maintenance or if you
archive a datastore for good.
Verification
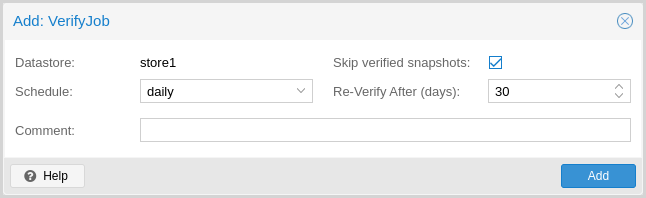
Proxmox Backup Server offers various verification options to ensure that backup data is intact. Verification is generally carried out through the creation of verify jobs. These are scheduled tasks that run verification at a given interval (see Calendar Events). With these, you can also set whether already verified snapshots are ignored, as well as set a time period, after which snapshots are checked again. The number of read and verify threads used for a verification job can be specified via the read-threads and verify-threads parameters. Possible values range from 1 to 32 threads, defaults being 1 reader and 4 verify threads. The interface for creating verify jobs can be found under the Verify Jobs tab of the datastore. Alternatively, you can verify all backups manually. The interface for this can be found under the Content tab of the datastore or can be done via the CLI:
# proxmox-backup-manager verify <datastore> --read-threads 1 --verify-threads 4 --ignore-verified false
Note
It is recommended that you reverify all backups at least monthly, even if a previous verification was successful. This is because physical drives are susceptible to damage over time, which can cause an old, working backup to become corrupted in a process known as bit rot/data degradation. It is good practice to have a regularly recurring (hourly/daily) verification job, which checks new and expired backups, then another weekly/monthly job that will reverify everything. This way, there will be no surprises when it comes to restoring data.
Aside from using verify jobs, you can also run verification manually on entire datastores, backup groups or snapshots. To do this, navigate to the Content tab of the datastore and either click Verify All or select the V. icon from the Actions column in the table.
Notifications
Proxmox Backup Server can send you notifications about automatically scheduled verification, garbage-collection and synchronization tasks results.
Refer to the Notifications chapter for more details.
Maintenance Mode
Proxmox Backup Server supports setting read-only and offline maintenance modes on a datastore.
Once enabled, depending on the mode, new reads and/or writes to the datastore are blocked, allowing an administrator to safely execute maintenance tasks, for example, on the underlying storage.
Internally Proxmox Backup Server tracks whether each datastore access is a write or read operation, so that it can gracefully enter the respective mode, by allowing conflicting operations that started before enabling the maintenance mode to finish.
The supported maintenance modes are:
read-only: Only read operations are allowed on the datastore.offline: Neither read nor write operations are allowed on the datastore.