Network Management
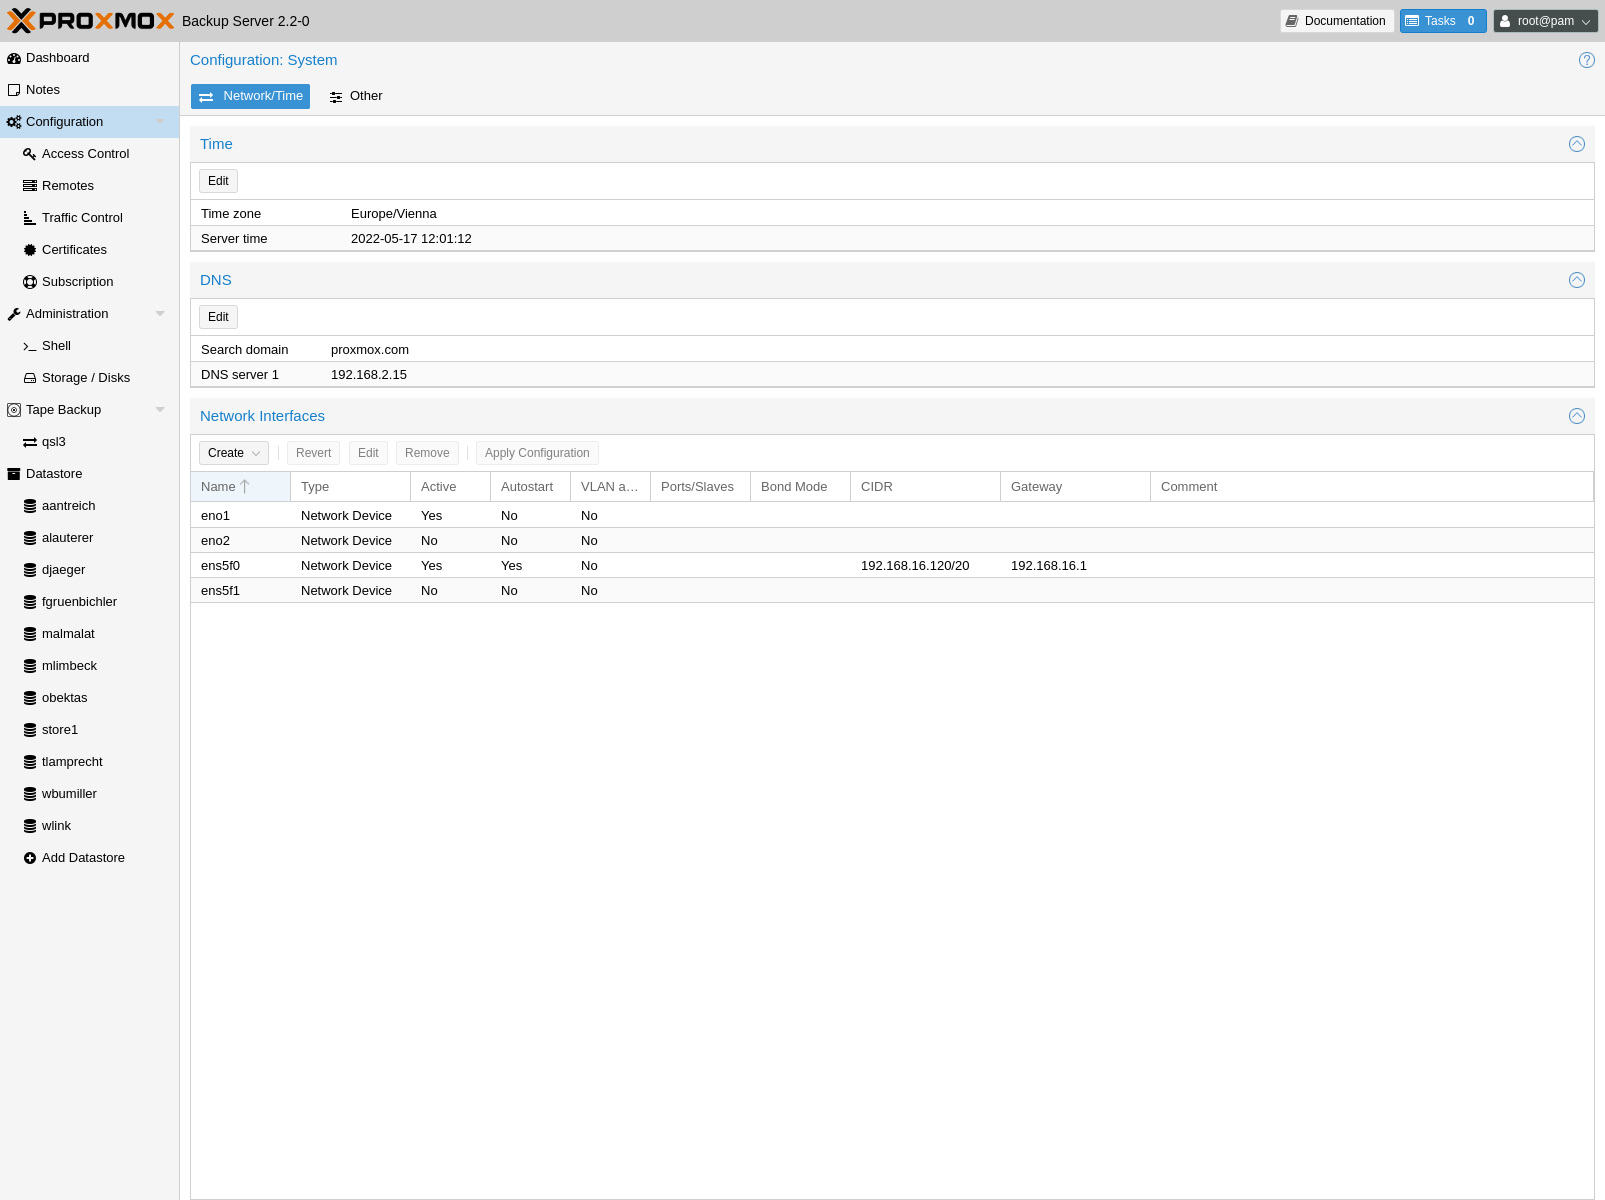
Proxmox Backup Server provides both a web interface and a command line tool for
network configuration. You can find the configuration options in the web
interface under the Network Interfaces section of the Configuration menu
tree item. The command line tool is accessed via the network subcommand.
These interfaces allow you to carry out some basic network management tasks,
such as adding, configuring, and removing network interfaces.
Note
Any changes made to the network configuration are not
applied, until you click on Apply Configuration or enter the network
reload command. This allows you to make many changes at once. It also allows
you to ensure that your changes are correct before applying them, as making a
mistake here can render the server inaccessible over the network.
To get a list of available interfaces, use the following command:
# proxmox-backup-manager network list
┌───────┬────────┬───────────┬────────┬─────────────┬──────────────┬──────────────┐
│ name  │ type   │ autostart │ method │ address     │ gateway      │ ports/slaves │
╞═══════╪════════╪═══════════╪════════╪═════════════╪══════════════╪══════════════╡
│ bond0 │ bond   │         1 │ static │ x.x.x.x/x   │ x.x.x.x      │ ens18 ens19  │
├───────┼────────┼───────────┼────────┼─────────────┼──────────────┼──────────────┤
│ ens18 │ eth    │         1 │ manual │             │              │              │
├───────┼────────┼───────────┼────────┼─────────────┼──────────────┼──────────────┤
│ ens19 │ eth    │         1 │ manual │             │              │              │
└───────┴────────┴───────────┴────────┴─────────────┴──────────────┴──────────────┘
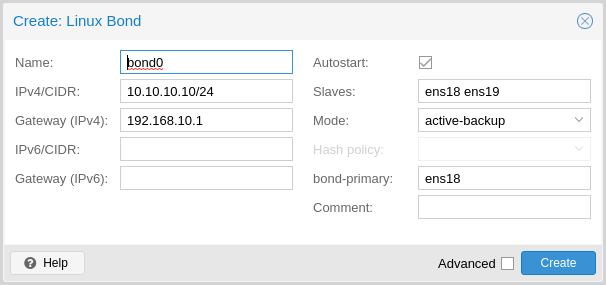
To add a new network interface, use the create subcommand with the relevant
parameters. For example, you may want to set up a bond, for the purpose of
network redundancy. The following command shows a template for creating the bond shown
in the list above:
# proxmox-backup-manager network create bond0 --type bond --bond_mode active-backup --slaves ens18,ens19 --autostart true --cidr x.x.x.x/x --gateway x.x.x.x
You can make changes to the configuration of a network interface with the
update subcommand:
# proxmox-backup-manager network update bond0 --cidr y.y.y.y/y
You can also remove a network interface:
# proxmox-backup-manager network remove bond0
The pending changes for the network configuration file will appear at the bottom of the web interface. You can also view these changes, by using the command:
# proxmox-backup-manager network changes
If you would like to cancel all changes at this point, you can either click on the Revert button or use the following command:
# proxmox-backup-manager network revert
If you are happy with the changes and would like to write them into the configuration file, select Apply Configuration. The corresponding command is:
# proxmox-backup-manager network reload
Note
This command and corresponding GUI button rely on the ifreload
command, from the package ifupdown2. This package is included within the
Proxmox Backup Server installation, however, you may have to install it yourself,
if you have installed Proxmox Backup Server on top of Debian or a Proxmox VE
version prior to version 7.
You can also configure DNS settings, from the DNS section
of Configuration or by using the dns subcommand of
proxmox-backup-manager.
Traffic Control
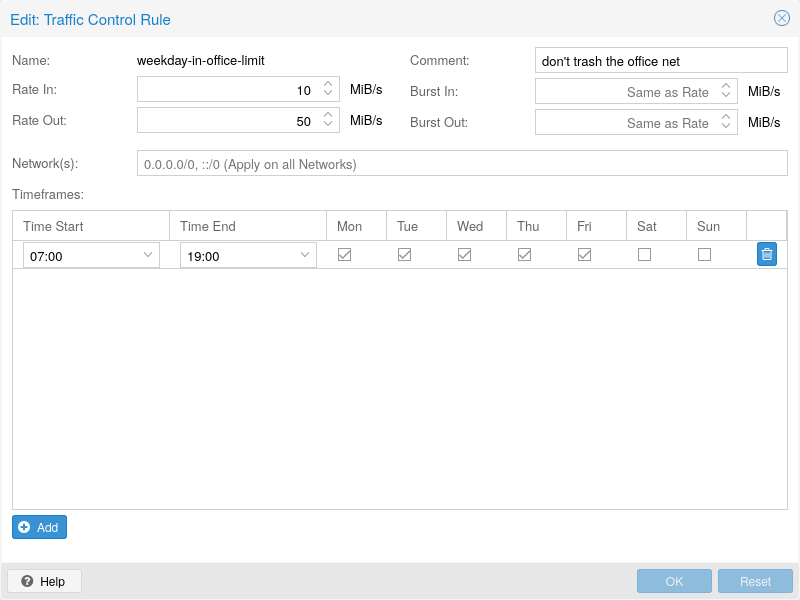
Creating and restoring backups can produce a lot of traffic, can impact shared storage and other users on the network.
With Proxmox Backup Server, you can constrain network traffic for clients within specified networks using a token bucket filter (TBF).
This allows you to avoid network congestion and prioritize traffic from certain hosts.
You can manage the traffic controls either via the web-interface or using the
traffic-control commands of the proxmox-backup-manager command-line
tool.
Note
Sync jobs on the server are not affected by the configured rate-in limits. If you want to limit the incoming traffic that a pull-based sync job generates, you need to setup a job-specific rate-in limit. See Sync Jobs.
The following command adds a traffic control rule to limit all IPv4 clients
(network 0.0.0.0/0) to 100 MB/s:
# proxmox-backup-manager traffic-control create rule0  --network 0.0.0.0/0 \
  --rate-in 100MB --rate-out 100MB \
  --comment "Default rate limit (100MB/s) for all clients"
Note
To limit both IPv4 and IPv6 network spaces, you need to pass two
network parameters ::/0 and 0.0.0.0/0.
It is possible to restrict rules to certain time frames, for example the company's office hours:
Tip
You can use SI (base 10: KB, MB, ...) or IEC (base 2: KiB, MiB, ...) units.
# proxmox-backup-manager traffic-control update rule0  \
  --timeframe "mon..fri 8-12" \
  --timeframe "mon..fri 14:30-18"
If there are multiple rules, the server chooses the one with the smaller network. For example, we can overwrite the setting for our private network (and the server itself) with:
# proxmox-backup-manager traffic-control create rule1 \
  --network 192.168.2.0/24 \
  --network 127.0.0.0/8 \
  --rate-in 20GB --rate-out 20GB \
  --comment "Use 20GB/s for the local network"
Note
The behavior is undefined if there are several rules for the same network.
If there are multiple rules which match a specific network, they will all be applied, which means that the smallest one wins, as it's bucket fills up the fastest.
To list the current rules, use:
# proxmox-backup-manager traffic-control list
┌───────┬─────────────┬─────────────┬─────────────────────────┬────────────...─┐
│ name  │     rate-in │    rate-out │ network                 │ timeframe  ... │
╞═══════╪═════════════╪═════════════╪═════════════════════════╪════════════...═╡
│ rule0 │      100 MB │      100 MB │ ["0.0.0.0/0"]           │ ["mon..fri ... │
├───────┼─────────────┼─────────────┼─────────────────────────┼────────────...─┤
│ rule1 │       20 GB │       20 GB │ ["192.168.2.0/24", ...] │            ... │
└───────┴─────────────┴─────────────┴─────────────────────────┴────────────...─┘
Rules can also be removed:
# proxmox-backup-manager traffic-control remove rule1
To show the state (current data rate) of all configured rules use:
# proxmox-backup-manager traffic-control traffic
┌───────┬─────────────┬──────────────┐
│ name  │ cur-rate-in │ cur-rate-out │
╞═══════╪═════════════╪══════════════╡
│ rule0 │         0 B │          0 B │
├───────┼─────────────┼──────────────┤
│ rule1 │   1.161 GiB │   19.146 KiB │
└───────┴─────────────┴──────────────┘