User Management
User Configuration
Proxmox Backup Server supports several authentication realms, and you need to choose the realm when you add a new user. Possible realms are:
| pam: | Linux PAM standard authentication. Use this if you want to authenticate as Linux system user (Users need to exist on the system). |
|---|---|
| pbs: | Proxmox Backup Server realm. This type stores hashed passwords in
/etc/proxmox-backup/shadow.json. |
After installation, there is a single user root@pam, which
corresponds to the Unix superuser. User configuration information is stored in the file
/etc/proxmox-backup/user.cfg. You can use the
proxmox-backup-manager command line tool to list or manipulate
users:
# proxmox-backup-manager user list
┌─────────────┬────────┬────────┬───────────┬──────────┬────────────────┬────────────────────┐
│ userid      │ enable │ expire │ firstname │ lastname │ email          │ comment            │
╞═════════════╪════════╪════════╪═══════════╪══════════╪════════════════╪════════════════════╡
│ root@pam    │      1 │        │           │          │                │ Superuser          │
└─────────────┴────────┴────────┴───────────┴──────────┴────────────────┴────────────────────┘
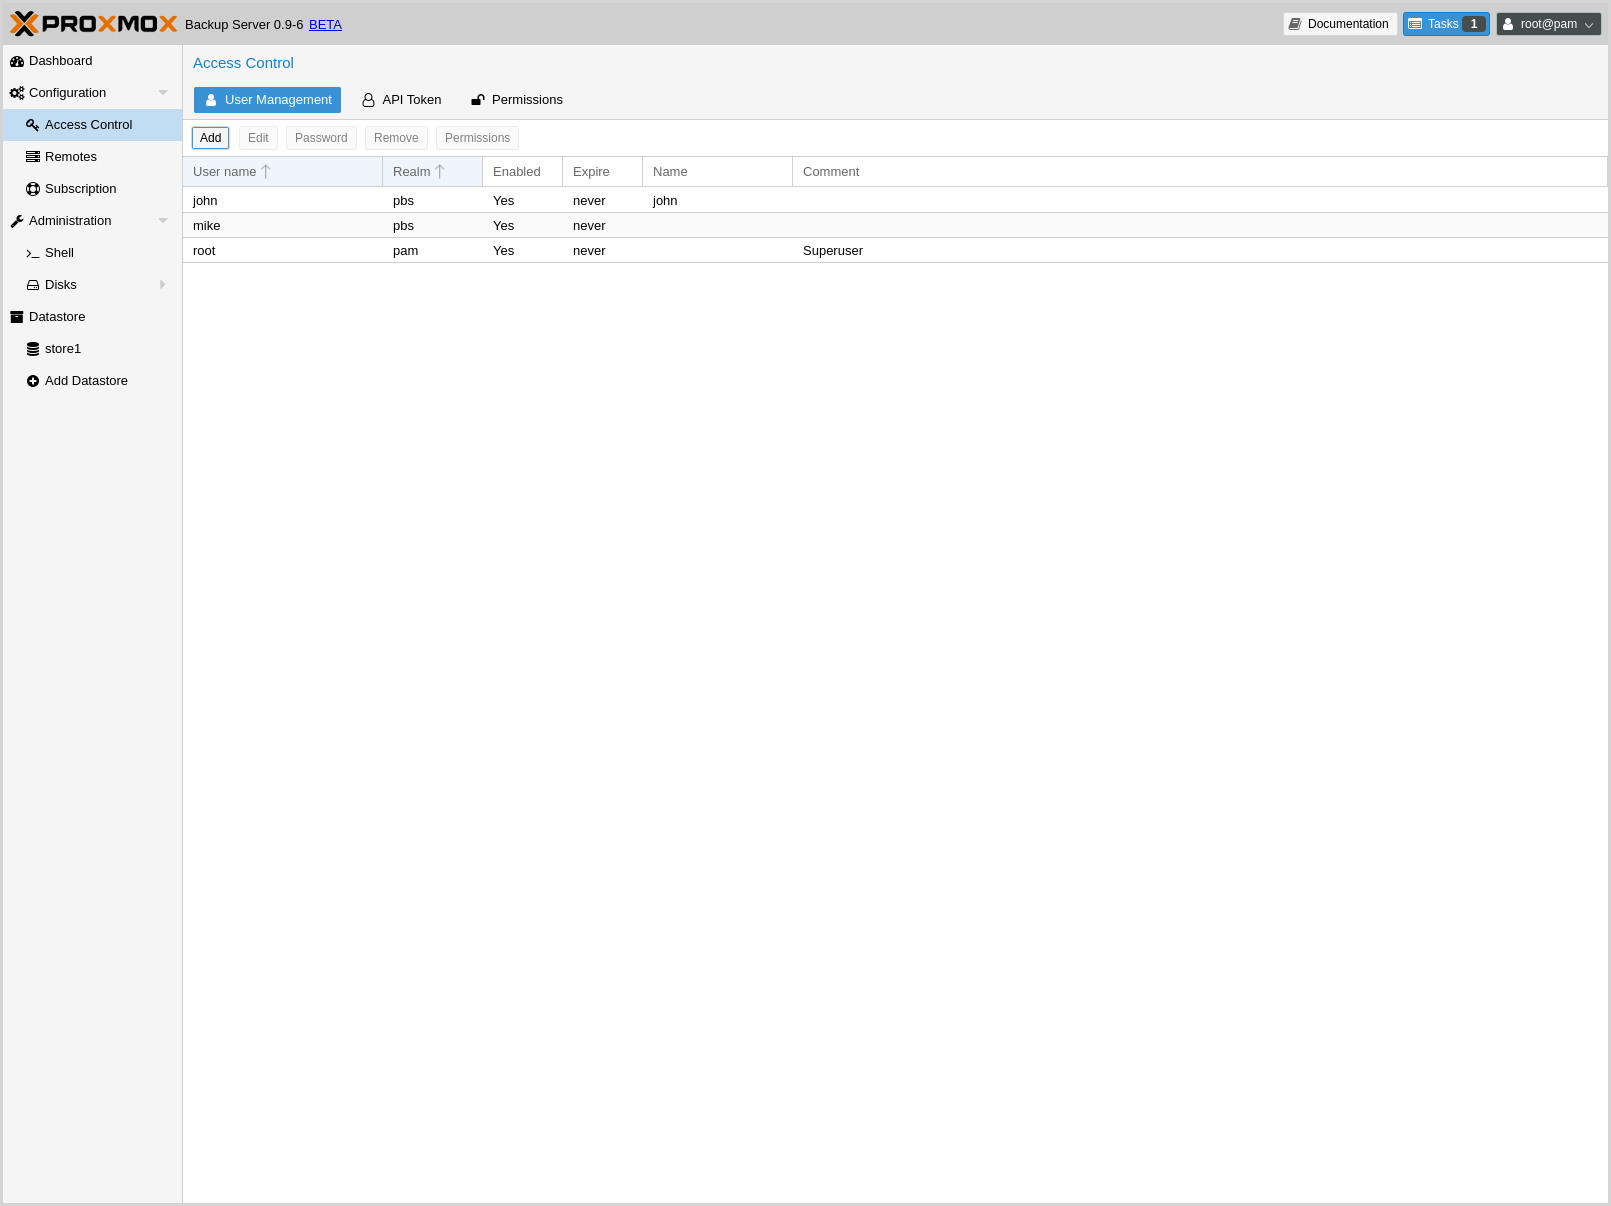
The superuser has full administration rights on everything, so you
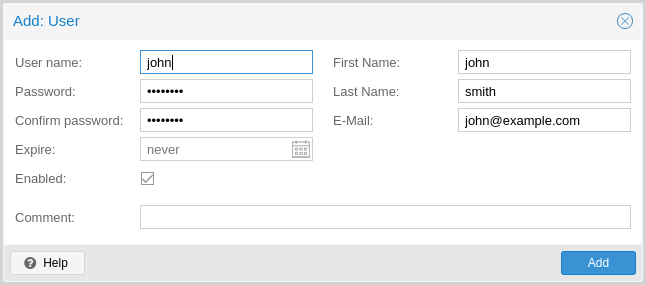
normally want to add other users with less privileges. You can add a new
user with the user create subcommand or through the web
interface, under the User Management tab of Configuration -> Access
Control. The create subcommand lets you specify many options like
--email or --password. You can update or change any user properties
using the update subcommand later (Edit in the GUI):
# proxmox-backup-manager user create john@pbs --email john@example.com
# proxmox-backup-manager user update john@pbs --firstname John --lastname Smith
# proxmox-backup-manager user update john@pbs --comment "An example user."
The resulting user list looks like this:
# proxmox-backup-manager user list
┌──────────┬────────┬────────┬───────────┬──────────┬──────────────────┬──────────────────┐
│ userid   │ enable │ expire │ firstname │ lastname │ email            │ comment          │
╞══════════╪════════╪════════╪═══════════╪══════════╪══════════════════╪══════════════════╡
│ john@pbs │      1 │        │ John      │ Smith    │ john@example.com │ An example user. │
├──────────┼────────┼────────┼───────────┼──────────┼──────────────────┼──────────────────┤
│ root@pam │      1 │        │           │          │                  │ Superuser        │
└──────────┴────────┴────────┴───────────┴──────────┴──────────────────┴──────────────────┘
Newly created users do not have any permissions. Please read the Access Control section to learn how to set access permissions.
If you want to disable a user account, you can do that by setting --enable to 0
# proxmox-backup-manager user update john@pbs --enable 0
Or completely remove the user with:
# proxmox-backup-manager user remove john@pbs
API Tokens
Any authenticated user can generate API tokens which can in turn be used to configure various clients, instead of directly providing the username and password.
API tokens serve two purposes:
- Easy revocation in case client gets compromised
- Limit permissions for each client/token within the users' permission
An API token consists of two parts: an identifier consisting of the user name,
the realm and a tokenname (user@realm!tokenname), and a secret value. Both
need to be provided to the client in place of the user ID (user@realm) and
the user password, respectively.
The API token is passed from the client to the server by setting the
Authorization HTTP header with method PBSAPIToken to the value
TOKENID:TOKENSECRET.
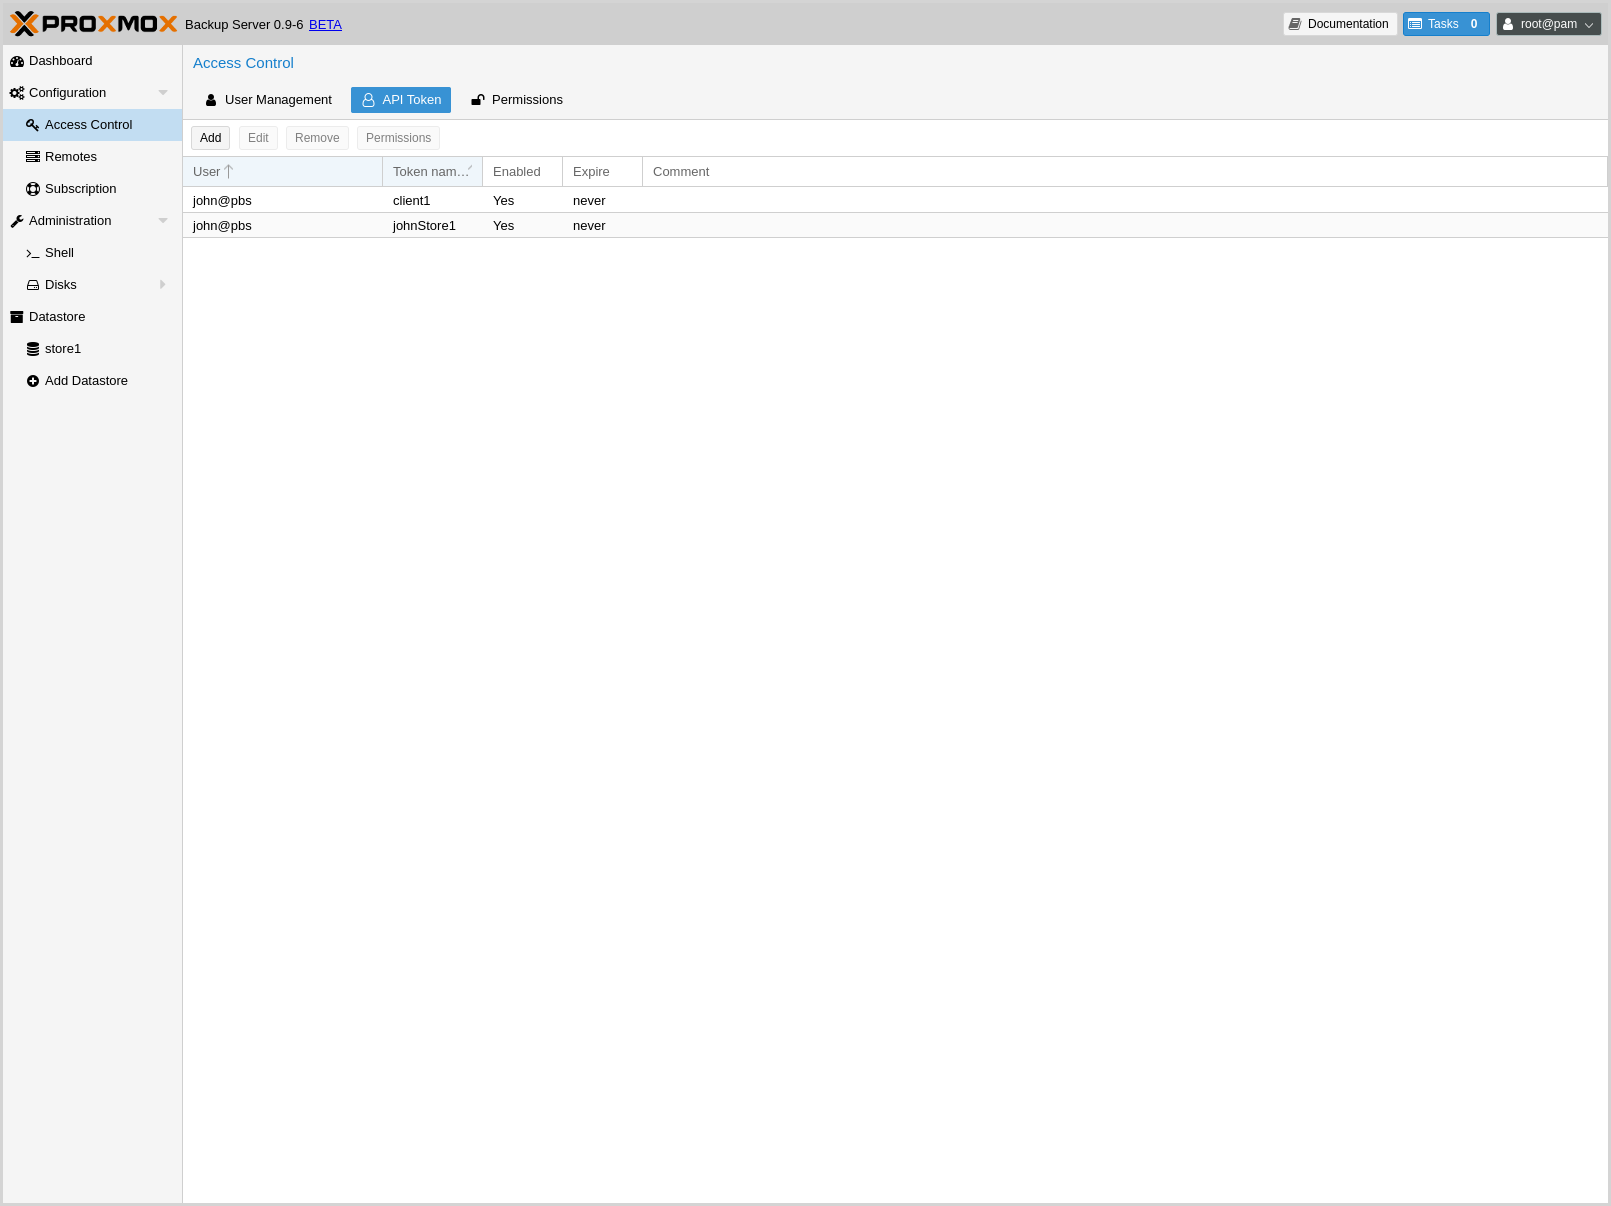
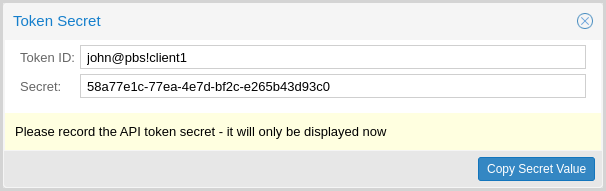
Generating new tokens can done using proxmox-backup-manager or the GUI:
# proxmox-backup-manager user generate-token john@pbs client1
Result: {
  "tokenid": "john@pbs!client1",
  "value": "d63e505a-e3ec-449a-9bc7-1da610d4ccde"
}
Note
The displayed secret value needs to be saved, since it cannot be displayed again after generating the API token.
The user list-tokens sub-command can be used to display tokens and their
metadata:
# proxmox-backup-manager user list-tokens john@pbs
┌──────────────────┬────────┬────────┬─────────┐
│ tokenid          │ enable │ expire │ comment │
╞══════════════════╪════════╪════════╪═════════╡
│ john@pbs!client1 │      1 │        │         │
└──────────────────┴────────┴────────┴─────────┘
Similarly, the user delete-token subcommand can be used to delete a token
again.
Newly generated API tokens don't have any permissions. Please read the next section to learn how to set access permissions.
Access Control
By default new users and API tokens do not have any permission. Instead you need to specify what is allowed and what is not. You can do this by assigning roles to users/tokens on specific objects like datastores or remotes. The following roles exist:
- NoAccess
- Disable Access - nothing is allowed.
- Admin
- Can do anything.
- Audit
- Can view things, but is not allowed to change settings.
- DatastoreAdmin
- Can do anything on datastores.
- DatastoreAudit
- Can view datastore settings and list content. But is not allowed to read the actual data.
- DatastoreReader
- Can Inspect datastore content and can do restores.
- DatastoreBackup
- Can backup and restore owned backups.
- DatastorePowerUser
- Can backup, restore, and prune owned backups.
- RemoteAdmin
- Can do anything on remotes.
- RemoteAudit
- Can view remote settings.
- RemoteSyncOperator
- Is allowed to read data from a remote.
Access permission information is stored in /etc/proxmox-backup/acl.cfg. The
file contains 5 fields, separated using a colon (':') as a delimiter. A typical
entry takes the form:
acl:1:/datastore:john@pbs:DatastoreBackup
The data represented in each field is as follows:
aclidentifier- A
1or0, representing whether propagation is enabled or disabled, respectively - The object on which the permission is set. This can be a specific object (single datastore, remote, etc.) or a top level object, which with propagation enabled, represents all children of the object also.
- The user(s)/token(s) for which the permission is set
- The role being set
You can manage permissions via Configuration -> Access Control ->
Permissions in the web interface. Likewise, you can use the acl
subcommand to manage and monitor user permissions from the command line. For
example, the command below will add the user john@pbs as a
DatastoreAdmin for the datastore store1, located at
/backup/disk1/store1:
# proxmox-backup-manager acl update /datastore/store1 DatastoreAdmin --auth-id john@pbs
You can list the ACLs of each user/token using the following command:
# proxmox-backup-manager acl list
┌──────────┬───────────────────┬───────────┬────────────────┐
│ ugid     │ path              │ propagate │ roleid         │
╞══════════╪═══════════════════╪═══════════╪════════════════╡
│ john@pbs │ /datastore/store1 │         1 │ DatastoreAdmin │
└──────────┴───────────────────┴───────────┴────────────────┘
A single user/token can be assigned multiple permission sets for different datastores.
Note
Naming convention is important here. For datastores on the host,
you must use the convention /datastore/{storename}. For example, to set
permissions for a datastore mounted at /mnt/backup/disk4/store2, you would use
/datastore/store2 for the path. For remote stores, use the convention
/remote/{remote}/{storename}, where {remote} signifies the name of the
remote (see Remote below) and {storename} is the name of the datastore on
the remote.
API Token permissions
API token permissions are calculated based on ACLs containing their ID independent of those of their corresponding user. The resulting permission set on a given path is then intersected with that of the corresponding user.
In practice this means:
- API tokens require their own ACL entries
- API tokens can never do more than their corresponding user
Effective permissions
To calculate and display the effective permission set of a user or API token
you can use the proxmox-backup-manager user permission command:
# proxmox-backup-manager user permissions john@pbs --path /datastore/store1
Privileges with (*) have the propagate flag set

Path: /datastore/store1
- Datastore.Audit (*)
- Datastore.Backup (*)
- Datastore.Modify (*)
- Datastore.Prune (*)
- Datastore.Read (*)
- Datastore.Verify (*)

# proxmox-backup-manager acl update /datastore/store1 DatastoreBackup --auth-id 'john@pbs!client1'
# proxmox-backup-manager user permissions 'john@pbs!client1' --path /datastore/store1
Privileges with (*) have the propagate flag set

Path: /datastore/store1
- Datastore.Backup (*)
Two-factor authentication
Introduction
With simple authentication, only a password (single factor) is required to successfully claim an identity (authenticate), for example, to be able to log in as root@pam on a specific instance of Proxmox Backup Server. In this case, if the password gets stolen or leaked, anybody can use it to log in - even if they should not be allowed to do so.
With two-factor authentication (TFA), a user is asked for an additional factor to verify their authenticity. Rather than relying on something only the user knows (a password), this extra factor requires something only the user has, for example, a piece of hardware (security key) or a secret saved on the user's smartphone. This prevents a remote user from gaining unauthorized access to an account, as even if they have the password, they will not have access to the physical object (second factor).
Available Second Factors
You can set up multiple second factors, in order to avoid a situation in which losing your smartphone or security key locks you out of your account permanently.
Proxmox Backup Server supports three different two-factor authentication methods:
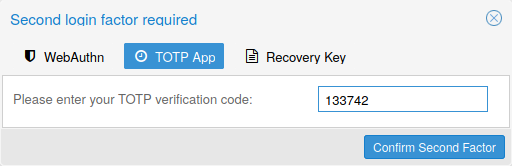
- TOTP (Time-based One-Time Password). A short code derived from a shared secret and the current time, it changes every 30 seconds.
- WebAuthn (Web Authentication). A general standard for authentication. It is implemented by various security devices, like hardware keys or trusted platform modules (TPM) from a computer or smart phone.
- Single use Recovery Keys. A list of keys which should either be printed out and locked in a secure place or saved digitally in an electronic vault. Each key can be used only once. These are perfect for ensuring that you are not locked out, even if all of your other second factors are lost or corrupt.
Setup
TOTP
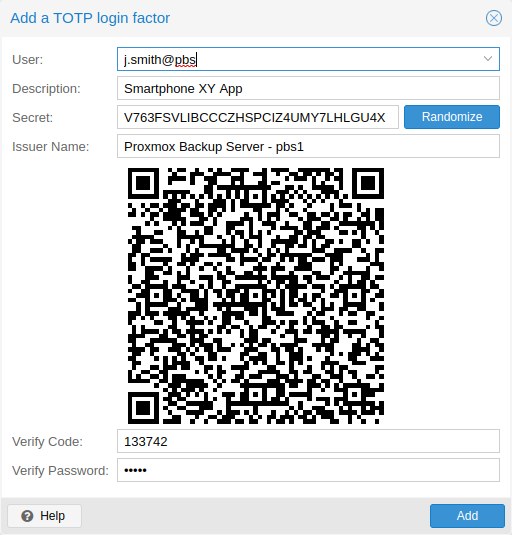
There is no server setup required. Simply install a TOTP app on your smartphone (for example, FreeOTP) and use the Proxmox Backup Server web-interface to add a TOTP factor.
WebAuthn
For WebAuthn to work, you need to have two things:
- a trusted HTTPS certificate (for example, by using Let's Encrypt). While it probably works with an untrusted certificate, some browsers may warn or refuse WebAuthn operations if it is not trusted.
- setup the WebAuthn configuration (see Configuration -> Authentication in the Proxmox Backup Server web-interface). This can be auto-filled in most setups.
Once you have fulfilled both of these requirements, you can add a WebAuthn configuration in the Access Control panel.
Recovery Keys
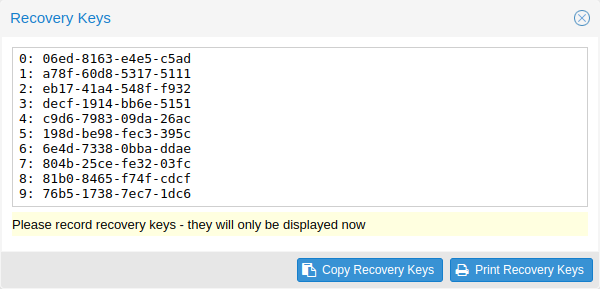
Recovery key codes do not need any preparation; you can simply create a set of recovery keys in the Access Control panel.
Note
There can only be one set of single-use recovery keys per user at any time.
TFA and Automated Access
Two-factor authentication is only implemented for the web-interface. You should use API Tokens for all other use cases, especially non-interactive ones (for example, adding a Proxmox Backup Server to Proxmox VE as a storage).